Part 1: Registering objects
On the public internet, regional internet registries (RIRs) operate a database of maintainers, persons and prefixes and autonomous systems. Autonomous systems are networks maintained by a single entity and are assigned numbers (ASNs) and a portion of the IP address space (prefixes). DN42 operates a single registry that is hosted on Git.
We begin by registring an account on their Gitea site. The user name you pick will identify you on DN42.
Clone down the registry repository and create a feature branch in the format etherarp-20211103/register (replacing etherarp and the date with the appropriate values).
We need to create mntner, person, route, inetnum, autnum objects. You can look at my pull request to see the formats. We can use the following tools to find available ASNs and IP ranges.
You also need to sign your commit with a key that is specified in the auth field of the mntner object. I opted to use an SSH key for two reasons
1. It's what I had on hand
2. It can be used to grant me access to servers on DN42
We then sign the commit by getting the commit hash and running the following command to get a signature (which we place in the text on the pull request)
echo $COMMIT_HASH | ssh-keygen -Y sign -f ~/.ssh/id_ed25519 -n dn42
Part 2: Setting up infrastructure
I decided to host my network on Vultr cloud. I created two instances
1. VyOS router (you can find it in the ISO section
2. Debian client
Make sure you tick private networking for both instances.
The VyOS router will not boot up with an IP addresses, we have to manually configure it in the console to set up internet connectivity and SSH. When setting up SSH, it's a good idea to temporarily enable the Cloud firewall from your provider. Once passwords and host firewall rules have been set, we may disable it to prevent any connectivity issues with our peers.
I use the following commands to set up my VyOs router
# Define my home network for the firewall
set firewall group network-group HOME network '203.0.113.0/24'

# Create an IPv6 firewall (for the internet)
set firewall ipv6-name WANv6_LOCAL default-action 'accept'
set firewall ipv6-name WANv6_LOCAL rule 1 action 'reject'
set firewall ipv6-name WANv6_LOCAL rule 1 description 'Reject-All-SSH'
set firewall ipv6-name WANv6_LOCAL rule 1 destination port 'ssh'
set firewall ipv6-name WANv6_LOCAL rule 1 protocol 'tcp'

# Define an IPv4 firewall (for the internet)
# Allow SSH from home; block bgp and dns
set firewall name WANv4_LOCAL default-action 'accept'
set firewall name WANv4_LOCAL rule 1 action 'accept'
set firewall name WANv4_LOCAL rule 1 description 'Allow-Home-SSH'
set firewall name WANv4_LOCAL rule 1 destination port 'ssh'
set firewall name WANv4_LOCAL rule 1 protocol 'tcp'
set firewall name WANv4_LOCAL rule 1 source group network-group 'HOME'
set firewall name WANv4_LOCAL rule 2 action 'reject'
set firewall name WANv4_LOCAL rule 2 description 'Reject-All-SSH'
set firewall name WANv4_LOCAL rule 2 destination port 'ssh'
set firewall name WANv4_LOCAL rule 2 protocol 'tcp'
set firewall name WANv4_LOCAL rule 3 action 'reject'
set firewall name WANv4_LOCAL rule 3 description 'Reject-All-DNS'
set firewall name WANv4_LOCAL rule 3 destination port 'domain'
set firewall name WANv4_LOCAL rule 3 protocol 'tcp_udp'
set firewall name WANv4_LOCAL rule 4 action 'reject'
set firewall name WANv4_LOCAL rule 4 description 'Reject-All-BGP'
set firewall name WANv4_LOCAL rule 4 destination port 'bgp'
set firewall name WANv4_LOCAL rule 4 protocol 'tcp'

# Set the primary interface to use DHCP
# Bind it to the firewall
set interfaces ethernet eth0 address 'dhcp'
set interfaces ethernet eth0 firewall local ipv6-name 'WANv6_LOCAL'
set interfaces ethernet eth0 firewall local name 'WANv4_LOCAL'

# Create a password for your user
set system login user vyos authentication plaintext-password 'hunter2'

# Define an ssh key for your user
set system login user vyos authentication public-keys workstation key 'REPLACE-WITH-YOUR-KEY'
set system login user vyos authentication public-keys workstation type 'ssh-ed25519'

# Enable SSH
set service ssh
Part 3: Finding a peer
I chose to peer with JLU5 who operates multiple points of presence to DN42. This required setting up a Wireguard VPN.
I began by generating my keys. I found on my version of VyOS I had issues with directories missing so I had to create them prior to generating my keys. I used the following commands
sudo mkdir -p /config/auth/wireguard
sudo chown -R vyos /config/auth/wireguard
generate wireguard keypair
show wireguard pubkey
Now that we have the keys generated, we can begin setting up the VPN
# Set an inbound firewall for Wireguard traffic
set firewall name WGv4_LOCAL default-action 'accept'
set firewall name WGv4_LOCAL rule 1 action 'reject'
set firewall name WGv4_LOCAL rule 1 description 'Reject-All-SSH'
set firewall name WGv4_LOCAL rule 1 destination port 'ssh'
set firewall name WGv4_LOCAL rule 1 protocol 'tcp'

# Define the wireguard interface (use the first host IP of your prefix)
set interfaces wireguard wg1 address '172.21.99.225/32'
set interfaces wireguard wg1 description 'DN42 Peering'
set interfaces wireguard wg1 firewall local name 'WGv4_LOCAL'

# Your local port for Wireguard
# This must be open from the internet
set interfaces wireguard wg1 port '51820'

# Define your Peer
set interfaces wireguard wg1 peer dn42-us-lax01.jlu5.com allowed-ips '0.0.0.0/0'
set interfaces wireguard wg1 peer dn42-us-lax01.jlu5.com endpoint '185.198.26.55:21678'
set interfaces wireguard wg1 peer dn42-us-lax01.jlu5.com pubkey 'H5XoB+8N4LoMAW4+vJ2jD6fO5vqQGZdj4MSip5clcCg='

# Your peers IP address goes here
set protocols static interface-route 172.20.229.122/32 next-hop-interface wg1
Next we email our peer with our public key, external IP, port, and the internal IP we have assigned to the wireguard interface.
We can then confirm the tunnel is up by pinging our peer
vyos@vyos:~$ ping 172.20.229.122
PING 172.20.229.122 (172.20.229.122) 56(84) bytes of data.
64 bytes from 172.20.229.122: icmp_seq=1 ttl=64 time=0.818 ms
64 bytes from 172.20.229.122: icmp_seq=2 ttl=64 time=0.871 ms
64 bytes from 172.20.229.122: icmp_seq=3 ttl=64 time=0.782 ms
^C
--- 172.20.229.122 ping statistics ---
3 packets transmitted, 3 received, 0% packet loss, time 2025ms
rtt min/avg/max/mdev = 0.782/0.823/0.871/0.049 ms
Part 4: Configuring BGP
Now we have established a tunnel with our peer, we can announce our ASN and prefix over BGP. BGP is known as the Border Gateway Protocol and is used by ISPs and large networks to exchange routing information over the internet
When configuring BGP, the two most crucical details are your local autonomous systems number and your peer's autonomous system number.
The below BGP configuration uses route maps to filter the prefixes that can be shared to (export) or learned from (import) with our neighbour. In this scenario, we only want to exchange routes that are related to DN42!
# Configure my local BGP Parameters
set protocols bgp 4242421678 address-family ipv4-unicast network 172.21.99.224/27
set protocols bgp 4242421678 parameters router-id 172.21.99.225

# Define the DN42 Network
set policy prefix-list DN42-Network rule 10 action 'permit'
set policy prefix-list DN42-Network rule 10 le '32'
set policy prefix-list DN42-Network rule 10 prefix '172.20.0.0/14'
set policy prefix-list DN42-Network rule 20 action 'permit'
set policy prefix-list DN42-Network rule 20 le '32'
set policy prefix-list DN42-Network rule 20 prefix '10.0.0.0/8'
set policy prefix-list6 DN42-Network-v6 rule 10 action 'permit'
set policy prefix-list6 DN42-Network-v6 rule 10 le '128'
set policy prefix-list6 DN42-Network-v6 rule 10 prefix 'fd00::/8'

# Configure the route map for DN42 prefixes
set policy route-map Default-Peering rule 20 action 'permit'
set policy route-map Default-Peering rule 20 description 'Allow DN42-Network'
set policy route-map Default-Peering rule 20 match ip address prefix-list 'DN42-Network'
set policy route-map Default-Peering rule 21 action 'permit'
set policy route-map Default-Peering rule 21 description 'Allow DN42-Network'
set policy route-map Default-Peering rule 21 match ip address prefix-list6 'DN42-Network-v6'
set policy route-map Default-Peering rule 99 action 'deny'

# Peer with JLU5
set protocols bgp 4242421678 neighbor 172.20.229.122 remote-as 4242421080
set protocols bgp 4242421678 neighbor 172.20.229.122 ebgp-multihop '20'

# Apply route filtering to my neighbour
set protocols bgp 4242421678 neighbor 172.20.229.122 address-family ipv4-unicast route-map export 'Default-Peering'
set protocols bgp 4242421678 neighbor 172.20.229.122 address-family ipv4-unicast route-map import 'Default-Peering'
set protocols bgp 4242421678 neighbor 172.20.229.122 address-family ipv6-unicast route-map export 'Default-Peering'
set protocols bgp 4242421678 neighbor 172.20.229.122 address-family ipv6-unicast route-map import 'Default-Peering'
Next, let's verify our routing table
vyos@vyos:~$ show ip bgp
BGP table version is 3720, local router ID is 172.21.99.225, vrf id 0
Default local pref 100, local AS 4242421678
Status codes:  s suppressed, d damped, h history, * valid, > best, = multipath,
               i internal, r RIB-failure, S Stale, R Removed
Nexthop codes: @NNN nexthop's vrf id, < announce-nh-self
Origin codes:  i - IGP, e - EGP, ? - incomplete

   Network          Next Hop            Metric LocPrf Weight Path
*> 10.11.160.0/20   172.20.229.122                         0 4242421080 4242423618 4242422855 64875 i
*> 10.37.0.0/16     172.20.229.122                         0 4242421080 4242421876 65043 65037 i
*> 10.50.0.0/16     172.20.229.122                         0 4242421080 4242421876 65043 65024 i
*> 10.56.0.0/16     172.20.229.122                         0 4242421080 4242421876 65043 65037 i
*> 10.60.128.0/20   172.20.229.122                         0 4242421080 4242421876 65043 i
As DN42 is a large network, we should see lots of routes.
Next, let's verify we can access a host over DN42. Let's try the DN42 Anycast DNS service
vyos@vyos:~$ ping 172.20.0.53
PING 172.20.0.53 (172.20.0.53) 56(84) bytes of data.
64 bytes from 172.20.0.53: icmp_seq=1 ttl=62 time=1.30 ms
64 bytes from 172.20.0.53: icmp_seq=2 ttl=62 time=1.76 ms
64 bytes from 172.20.0.53: icmp_seq=3 ttl=62 time=1.39 ms
^C
--- 172.20.0.53 ping statistics ---
3 packets transmitted, 3 received, 0% packet loss, time 2003ms
rtt min/avg/max/mdev = 1.300/1.486/1.761/0.200 ms
vyos@vyos:~$ dig +short SOA DN42 @172.20.0.53
j.master.delegation-servers.dn42. jrb0001.as4242420119.dn42. 1636112927 900 900 86400 900
vyos@vyos:~$
We can also use a network looking glass to see if other routers on DN42 can see us.
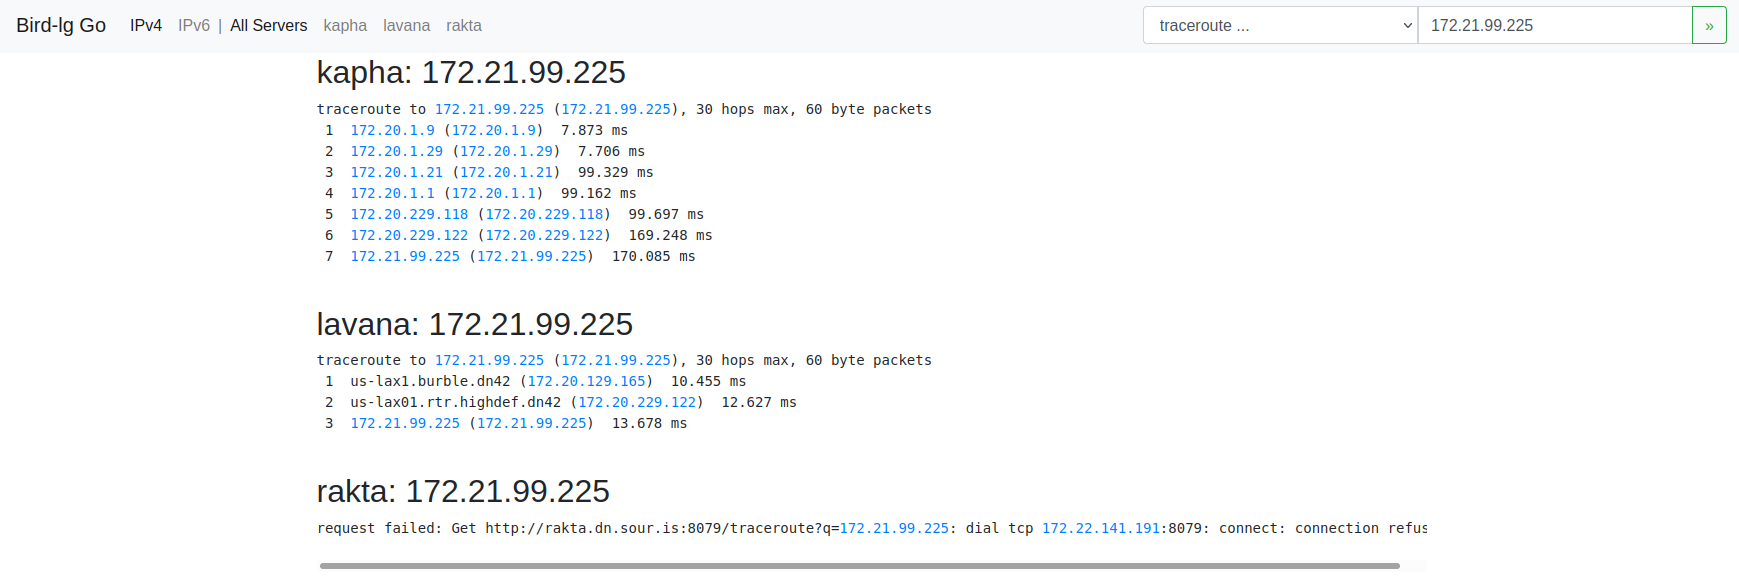
Part 5: Configuring our client
At this point, we are basically done! We have confirmed we are connected to DN42. Let's set up that second machine we created to connect into DN42 using our VyOS router.
We begin by configuring the second interface on our VyOS router. This second interface is our cloud provider's private network
set interfaces ethernet eth1 address '172.21.99.254/27'
set interfaces ethernet eth1 mtu '1450'
Now, we log onto that second machine and begin configuring its networking. Since it's Debian, we will use the classic /etc/network/interfaces file
# /etc/network/interfaces.d/1-static
auto lo
iface lo inet loopback
    dns-nameservers 108.61.10.10

auto enp1s0
iface enp1s0 inet dhcp

# control-alias enp1s0
iface enp1s0 inet6 auto

auto enp6s0
iface enp6s0 inet static
    address 172.21.99.226
    netmask 255.255.255.224
    mtu 1450
    up ip route add to 172.20.0.0/14 via 172.21.99.254 dev enp6s0
    up ip route add to 10.0.0.0/8    via 172.21.99.254 dev enp6s0
We delete any existing files in /etc/network/interfaces.d and then ensure our configuration is not overriden by cloud-config. We do this by adding the following to /etc/cloud/cloud.cfg.d/99-disable-network-config.cfg
network: {config: disabled}
Next, let's set up some basic firewall rules on this machine.
*filter
:INPUT ACCEPT [20:1048]
:FORWARD ACCEPT [0:0]
:OUTPUT ACCEPT [245:24463]
:LAN_LOCAL - [0:0]
:WAN_LOCAL - [0:0]
-A INPUT -i enp1s0 -j WAN_LOCAL
-A INPUT -i enp6s0 -j LAN_LOCAL
-A LAN_LOCAL ! -s <YOUR-DN42-PREFIX> -p tcp -m tcp --dport 22 -j REJECT --reject-with icmp-port-unreachable
-A WAN_LOCAL -m conntrack --ctstate RELATED,ESTABLISHED -j ACCEPT
-A WAN_LOCAL -s <YOUR-HOME-IP> -p tcp -m tcp --dport 22 -j ACCEPT
-A WAN_LOCAL -j DROP
COMMIT
# Completed on Sat Nov  6 00:39:03 2021
Replace your-home-ip and your-dn42-prefix accordingly and the run iptables-restore on this file. You can then install iptables-persistent to keep these rules persistent.
Next, let's set up a DNS server to access DN42s namespace. I installed dnsmasq and replaced /etc/dnsmasq.conf with the following. Please replace the listen IP address accordingly
# Listen address and port
listen-address=172.21.99.226
listen-address=127.0.0.1
port=53

# Do not check resolv
no-poll
no-resolv

# Use quad9
server=9.9.9.9
server=149.112.112.112

# Forward DN42
rebind-domain-ok=dn42
server=/dn42/172.20.0.53

# Reverse Forwards for DN42
server=/10.in-addr.arpa/172.20.0.53
server=/20.172.in-addr.arpa/172.20.0.53
server=/21.172.in-addr.arpa/172.20.0.53
server=/23.172.in-addr.arpa/172.20.0.53
We can then update our resolv.conf on both machines to use this newly created DNS server
vyos@vyos:~$ dig shell.fr-rbx1.burble.dn42

; <<>> DiG 9.9.5-9+deb8u16-Debian <<>> shell.fr-rbx1.burble.dn42
;; global options: +cmd
;; Got answer:
;; ->>HEADER<<- opcode: QUERY, status: NOERROR, id: 50814
;; flags: qr rd ra; QUERY: 1, ANSWER: 1, AUTHORITY: 0, ADDITIONAL: 1

;; OPT PSEUDOSECTION:
; EDNS: version: 0, flags:; udp: 1232
;; QUESTION SECTION:
;shell.fr-rbx1.burble.dn42.	IN	A

;; ANSWER SECTION:
shell.fr-rbx1.burble.dn42. 3600	IN	A	172.20.129.31

;; Query time: 16 msec
;; SERVER: 172.21.99.226#53(172.21.99.226)
;; WHEN: Sat Nov 06 00:50:52 UTC 2021
;; MSG SIZE  rcvd: 70
Part 6: Accessing a service on DN42
There are a number of public internal services available on DN42 such as the shell service pictured above.
The shell service provides full access to a Linux server over SSH. Authentication is provided using your mntner name and the SSH key added to the auth field of that object.
Let's try it
[rohan@nuc1 ~]$ ssh etherarp@shell.fr-rbx1.burble.dn42 -J vyos
Welcome to VyOS
The authenticity of host 'shell.fr-rbx1.burble.dn42 (<no hostip for proxy command>)' can't be established.
ED25519 key fingerprint is SHA256:maO8tVa2Qpat/xVDhB++eWZvgnZ/IzW79xbPmrFqr5o.
This key is not known by any other names
Are you sure you want to continue connecting (yes/no/[fingerprint])? yes
Warning: Permanently added 'shell.fr-rbx1.burble.dn42' (ED25519) to the list of known hosts.
Welcome to Ubuntu 20.04.3 LTS (GNU/Linux 5.4.0-81-generic x86_64)

  System information as of Sat  6 Nov 00:53:16 UTC 2021

  System load:             0.03
  Usage of /home:          0.8% of 39.12GB
  Memory usage:            29%
  Swap usage:              0%
  Processes:               157
  Users logged in:         0
  IPv4 address for enp5s0: 172.20.129.31
  IPv6 address for enp5s0: fd42:4242:2601:1016:216:3eff:feae:51a8
  IPv4 address for enp6s0: 178.33.134.8
  IPv6 address for enp6s0: 2001:41d0:8:127:216:3eff:feae:51a8
----------------------------------------------------------------------------

This is shell.fr-rbx1.burble.dn42
See https://burble.dn42/services/shell/ for more details.

The service here is provided for your benefit.
Abuse just spoils the fun for everyone else and will not be tolerated.

If you have problems, or would like additional packages installed
you can raise an issue here: https://git.dn42.dev/burble/config-shell

----------------------------------------------------------------------------

Last login: Fri Nov  5 23:38:32 2021 from 172.21.99.225
etherarp@shell-fr-rbx1:~$
Notice how I'm actually connecting from my home machine. This is through the SSH ProxyJump option which I've described in another post
Let's measure the speed of the connections over the DN42 network. From our debian client, let's install and run iperf3
root@client1:~# apt-get install iperf3
Reading package lists... Done
Building dependency tree... Done
Reading state information... Done
The following NEW packages will be installed:
  iperf3
0 upgraded, 1 newly installed, 0 to remove and 0 not upgraded.
Need to get 0 B/28.4 kB of archives.
After this operation, 60.4 kB of additional disk space will be used.
Selecting previously unselected package iperf3.
(Reading database ... 38819 files and directories currently installed.)
Preparing to unpack .../iperf3_3.9-1_amd64.deb ...
Unpacking iperf3 (3.9-1) ...
Setting up iperf3 (3.9-1) ...
Processing triggers for man-db (2.9.4-2) ...
root@client1:~#
root@client1:~# iperf3 -s
-----------------------------------------------------------
Server listening on 5201
-----------------------------------------------------------
Now, let's measure the connection speed to our Debian machine from the shell server
etherarp@shell-fr-rbx1:~$ iperf3 -c 172.21.99.226
Connecting to host 172.21.99.226, port 5201
[  5] local 172.20.129.31 port 43036 connected to 172.21.99.226 port 5201
[ ID] Interval           Transfer     Bitrate         Retr  Cwnd
[  5]   0.00-1.00   sec  2.76 MBytes  23.2 Mbits/sec    0    428 KBytes
[  5]   1.00-2.00   sec  8.73 MBytes  73.2 Mbits/sec   10   1.78 MBytes
[  5]   2.00-3.00   sec  12.5 MBytes   105 Mbits/sec    0   1.95 MBytes
[  5]   3.00-4.00   sec  13.8 MBytes   115 Mbits/sec    0   2.09 MBytes
[  5]   4.00-5.00   sec  13.8 MBytes   115 Mbits/sec    0   2.20 MBytes
[  5]   5.00-6.00   sec  11.2 MBytes  94.4 Mbits/sec   12   1.61 MBytes
[  5]   6.00-7.00   sec  8.75 MBytes  73.4 Mbits/sec   27   1.20 MBytes
[  5]   7.00-8.00   sec  8.75 MBytes  73.4 Mbits/sec    0   1.27 MBytes
[  5]   8.00-9.00   sec  7.50 MBytes  62.9 Mbits/sec    0   1.31 MBytes
[  5]   9.00-10.00  sec  8.75 MBytes  73.4 Mbits/sec    0   1.34 MBytes
- - - - - - - - - - - - - - - - - - - - - - - - -
[ ID] Interval           Transfer     Bitrate         Retr
[  5]   0.00-10.00  sec  96.5 MBytes  80.9 Mbits/sec   49             sender
[  5]   0.00-10.15  sec  95.2 MBytes  78.7 Mbits/sec                  receiver

iperf Done.
etherarp@shell-fr-rbx1:~$
Not bad!
Conclusion and next steps
This was a fun weekend project and was a good introduction to BGP peering. As a next step, reverse DNS could be set for my prefix so that its IP addresses resolve to names.
Thanks for reading.
]]>Server options
Serve requests only $CADDYHOST environment variable
{$CADDYHOST}
Bind to IP address $CADDYBIND
bind {$CADDYBIND}
Define the web server root
root /srv/caddy/{$CADDYROOT}
Log requests to stdout
log / stdout "{>X-Forwarded-For} {remote} - {user} [{when}] \"{method} {uri} {proto}\" {status} {size} \"{>Referer}\" \"{>User-Agent}\""
TLS options
Set up Lets Encrypt with email $CADDYEMAIL
tls {$CADDYEMAIL}
Configure TLS with local certificate/key
tls cert.pem key.pem {
    protocols tls1.2 tls1.3
}
Configure TLS with client authentication
tls cert.pem key.pem {
    clients require ca.crt
}
Redirect HTTP to HTTPS
redir {
if {scheme} is http
/ https://{host}{uri}
}
Access & Authentication
HTTP Basic auth
basicauth /private {$BASICUSER} {$BASICPASS}
Allow directory browsing under /private
browse /private
Expose Caddy runtime stats at /private/stats
expvar /private/stats
Redirect HTTP to HTTPS
redir {
    if {scheme} is http
    / https://{host}{uri}
}
Github Oauth2 Login
redir 302 {
    if {path} is /
    / /login
}
login {
    github client_id={$GITHUB_CLIENT_ID},client_secret={$GITHUB_CLIENT_SECRET}
    redirect_check_referer false
    success_url /home.html
    logout_url /logout
}
jwt {
    path /
    redirect https://{host}/login
    allow sub {$GITHUB_ALLOWED_USERS}
}
Templating
Apply templating only to /private/templates
# See https://caddyserver.com/v1/docs/template-actions
templates /private/templates
Dynamically render /public/*.md as markdown (css optional)
markdown /public {
ext .md
css markdown.css
}
HTTP options
Add file extensions to unqualified requests - try until matched
ext .html .txt
Add/Modify the response headers
header / X-Frame-Options "DENY"
Enable Compression
gzip {
level 4
not /proxy
}
Generate an error page
errors {
404 error/404.html
* error/catchall.html
}
Proxy Options
Simple reverse proxy
proxy /proxy https://checkip.amazonaws.com
Reverse proxy with auth header
proxy /transmission http://localhost:9091 {
header_upstream Authorization "Basic dXNlcjpwYXNzd29yZAo="
}
Other
Define a snippet
(snippet_name) {

}
import snippet_name
Restricting SSH to a local subnet
As an example, let's restrict sshd to the 192.168.1.0/24 subnet. Run systemctl edit sshd.service and add the following.
[Service]
IPAccounting=yes
IPAddressDeny=0.0.0.0/0
IPAddressAllow=192.168.1.0/24
Then run systemctl daemon-reload; systemctl restart sshd
This post will look at how network namespaces can be connected together.
Basic use of Network Namespaces
Network namespaces restrict a process from "seeing" the network interfaces, IP addresses, routes, and firewall entries from the rest of the system. Network namespaces are managed via the iproute2 utility
Create Network namespace
ip netns add foo
ip netns add bar
Attach an interface to the network namespace
ip link set dev enp3s1f0 netns foo
Configure newly attached interface
ip netns exec foo ip l set dev enp3s1f0 up;
ip netns exec foo ip a add 192.168.1.3/24 dev enp3s1f0;
ip netns exec foo ip r add default via 192.168.1.1;
Run a process inside the namespace
ip netns exec foo nc -lkp 8080 <<< OK
Connecting between system and namespaces
In this example, we will use the newly created veth pair to connect the system to network namespace foo. Veth is a type of virtual ethernet interface that is always created as a pair. Veth can be thought of as a 'virtual crossover cable', it creates two virtual NICs that are connected
Defining a veth pair
ip link add veth1_left type veth peer veth1_right;
Create a bridge interface on the system
ip link add bridge0 type bridge;
ip link set bridge0 up;
ip addr add 10.13.37.1/24 dev bridge0;
Attach the left veth interface to the bridge
ip link set veth0_left master bridge0 up ;
Attach the right veth interface to the network namespace
# ip link set dev veth0_right netns foo;
Bring up the right interface inside the namespace
ip netns exec foo ip link set veth0_right name eth0;
ip netns exec foo ip link set dev eth0 up;
ip netns exec foo ip addr add 10.13.37.2/24 dev eth0;
Connecting between namespaces
Connecting one network namespace to another follows the same process as connecting a network namespace with the host. Create a veth pair and attach each side to the appropriate namespace
Create a veth pair
ip link add veth1_left type veth peer veth1_right
Attach the left veth to the foo namespace
ip link set veth1_left netns foo
Configure ip for the foo namespace
ip netns exec foo ip l set veth1_left name eth1;
ip netns exec foo ip l set eth1 up;
ip netns exec foo ip a add 10.9.9.10/30 dev eth1;
ip netns exec foo ip r add 0.0.0.0/0 via 10.9.9.9
Attach the right veth to the bar namespace
ip link set veth1_right netns bar
Configure IP for the bar namespace
ip netns exec bar ip l set veth1_right name eth0;
ip netns exec bar ip l set eth0 up;
ip netns exec bar ip a add 10.9.9.10/30 dev eth0;
ip netns exec bar ip r add 0.0.0.0/0 via 10.9.9.9'
Routing accross namespaces
Recall that we created a namespace (foo) that has both a veth link from the default namespace (host) and a veth link to a second namespace (bar). As a proof concept, let's configure connectivity between the system and the remote namespace
Create a static route on the system
ip route add 10.9.9.8/30 via 10.13.37.2
Verify connectivity
traceroute -n 10.9.9.10
traceroute to 10.9.9.10 (10.9.9.10), 30 hops max, 60 byte packets
 1  10.13.37.2  0.053 ms  0.013 ms  0.011 ms
 2  10.9.9.10  0.019 ms  0.014 ms  0.012 ms
Now, the system should be able to reach 10.9.9.10 (network namespace 'bar') routing via network namespace 'foo'. Connectivity can be verified with a ping or traceroute.
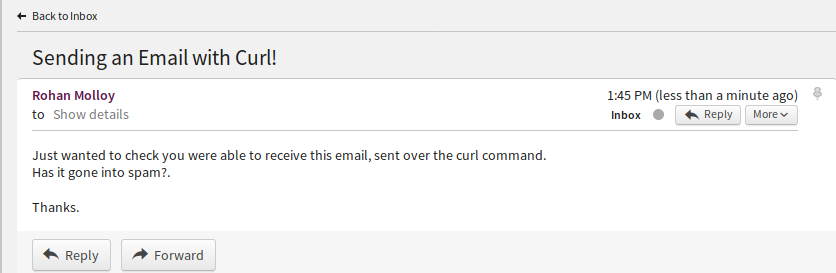
]]>Sending an Email
Just wanted to check you were able to receive this email, sent over the curl command.
Has it gone into spam?.
Thanks.
" | curl -s --ssl smtp://$SERVER --mail-from $FROM --mail-rcpt $TO --upload-file /dev/stdin --user rohan@example.etherarp.net
Enter host password for user 'rohan@example.etherarp.net':
[rohan@desktop ~]$
Let's see if the email was delivered (nb: the address has been changed to prevent spam)
Securing the credentials
In this example, the --user field did not specify a password, this results in a prompt. If you don't want to enter it manually, you can either hardcode it somewhere (bad) or use GPG encryption. With GPG, the gpg-agent can be configured to store credentials in memory. This way, you only need to enter the password once. Configuring gpg is out of the scope of this article
[rohan@desktop ~]$
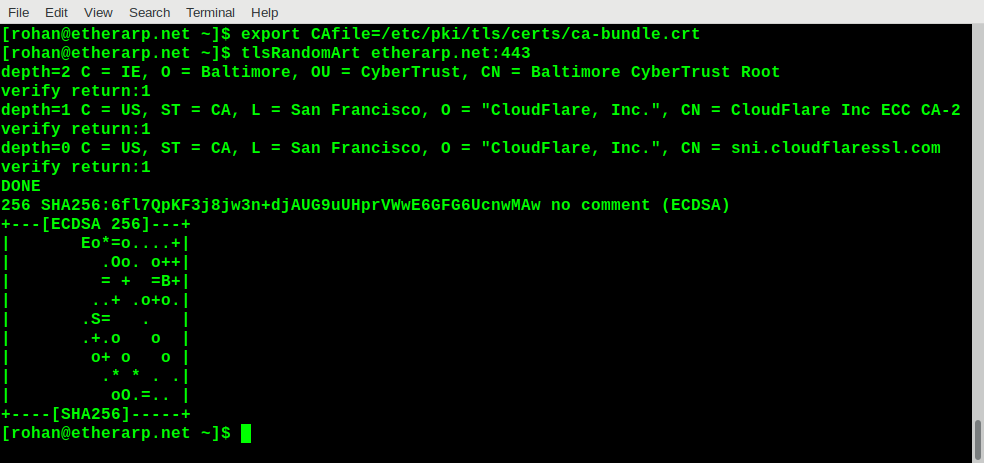
SSH Public Key infrastructure does not typically use certificates or certificate authorities, it pins the public keys directly, with a trust model based on TOFO (trust-on-first-use). When you first connect to an SSH server, it asks you to trust the host key and displays a visual representation of the key, like this

The public key cryptography SSH uses is very similar to what's used with TLS/SSL so it should be straightforward to generate the random art for an HTTPS server. The main difference with TLS is that certificates are verified rather than keys; certificates are generated from keys. So if a website you trust starts showing a certificate error, it will be useful to know whether or not the underlying key has changed.
My script is pretty simple and has the following steps:
openssl s_clientconnects to the server and verifies it against a CA bundle (this is optional). The server certificate is printedopenssl x509extracts the public key from the certificatessh-keygen -viconverts the public key from the standard TLS format-m PKCS8to the SSH formatssh-keygen -vlprints the random art
Trying it out
Final notes
The output is based on the public/private key pair used to generate the certificate signing request, not the certificate itself. So two certificates will give the same output even if they have a totally different common name and are signed by a completely different certificate authority.
This script could be used to check if a server is still secured with the same public key after its certificate has changed, or to detect man-in-the-middle attacks
Examining the permissions of /bin/ping
To view the permissions of a file, the stat -c "%a" command is used
4755
root@b6386528aa87:/# stat -c %a /bin/bash
755
root@b6386528aa87:/#
Looking at the /bin/ping file, we can see it has an extra permission bit (4), which bash does not have. This is the suid bit.
Adding and removing the suid bit
The chmod utility can be used to add the suid bit to an executable file. Let's look at what happens when we remove suid from ping and add it to the whoami executable
root@b6386528aa87:/# chmod -s /bin/ping
root@b6386528aa87:/# sudo -u nobody ping -c1 127.0.0.1
ping: Lacking privilege for raw socket.
root@b6386528aa87:/# sudo -u nobody whoami
root
root@b6386528aa87:/#
After removing setuid from ping, we cannot ping as an unprivileged user. Conversely, after adding the suid bit, whoami reports root even when running as nobody.
Finding all SUID binaries
The find command can be used to search for all the executables with the SUID permission (-perm -4000). In the following example, find is passing its output to ls -ldb. The -user root can be used to restrict the search to files owned by root.
-rwsr-xr-x. 1 root root 40000 Mar 29 2015 /bin/mount
-rwsr-xr-x. 1 root root 70576 Oct 28 2014 /bin/ping
-rwsr-xr-x. 1 root root 61392 Oct 28 2014 /bin/ping6
-rwsr-xr-x. 1 root root 40168 Feb 24 2017 /bin/su
-rwsr-xr-x. 1 root root 27416 Mar 29 2015 /bin/umount
-rwsr-xr-x. 1 root root 53616 Feb 24 2017 /usr/bin/chfn
-rwsr-xr-x. 1 root root 44464 Feb 24 2017 /usr/bin/chsh
-rwsr-xr-x. 1 root root 75376 Feb 24 2017 /usr/bin/gpasswd
-rwsr-xr-x. 1 root root 39912 Feb 24 2017 /usr/bin/newgrp
-rwsr-xr-x. 1 root root 54192 Feb 24 2017 /usr/bin/passwd
Disabling SUID Globally
Warning: This may break things
The SUID permission can be ignored globally by using the -o nosuid flag when mounting root. This will break things like sudo or su or services that drop privileges.
rohan@localhost:~$ sudo whoami
sudo: effective uid is not 0, is /usr/bin/sudo on a file system with the 'nosuid' option set or an NFS file system without root privileges?
Disabling SUID in Containers
The SUID capability can be dropped in containers via the --cap-drop=setuid option. See this page for more information https://www.redhat.com/en/blog/secure-your-containers-one-weird-trick
Replacing SUID with Granular Capabilities
The SUID permission does not provide granular privilege escalation. When a binary (for instance, /bin/ping) is elevated to root, it can do anything and everything, such as writing to system directories, installing kernel modules, or messing with hardware. This is poor security practice as it violates the principle of least privilege.
Going back to the example of /bin/ping, it runs as root because it requires the cap_net_raw privileged capability. So rather than elevating it to root, we can tell the kernel to grant that capability to that executable, even if invoked by an unprivileged user.
[root@centos7 ~]# sudo -u nobody ping -c1 localhost
ping: socket: Operation not permitted
[root@centos7 ~]# setcap cap_net_raw+p /bin/ping
[root@centos7 ~]# sudo -u nobody ping -c1 localhost
PING localhost (127.0.0.1) 56(84) bytes of data.
64 bytes from localhost (127.0.0.1): icmp_seq=1 ttl=64 time=0.045 ms
That's all for now. Thanks for reading!
]]>What are Network Namespaces?
Network namespaces are an important component of containerization in Linux. A network namespace (netns) allows a running process to see different network interfaces, routes, and firewall rules from the rest of the system. There are a number of use cases for network namespaces, such as running multiple servers, testing/staging environments and providing isolation of services.
Creating a Network Namespace
We begin by creating a generic systemd service for creating a named network namespace. I add the following to /usr/lib/systemd/system/netns@.service. In systemd, the @ mean the service takes a parameter which is passed to the unit via %i. E.g, we can run sudo systemctl start netns@webserver.service.
Unit to set up the interface
Next, we create a definition in /usr/lib/systemd/system/attach-enp3s1f0@.service. This service associates the enp3s1f0 with a specified network namespace. It also sets up addresses within the network namespace. In iproute2, the command to run a process within a specified network namespace is ip netns exec $namespace $command.
Running a process inside a network namespace
As a simple test, I define /usr/lib/systemd/system/webserver.service which runs a simple TCP server over netcat inside the netns. Notice the JoinsNamespaceOf=netns@webserver.service option, stating that the service join the network namespace of an already running service. I added some extra privilege constraint such as ProtectSystem=true and CapabilityBoundingSet= which are unrelated to network namespaces - these are for another post :)
Trying it out
After setting the above files, I run the following commands
netns@webserver.service \
attach-enp3s1f0@webserver.service \
webserver.service
Now the enp3s1f0 interface has disappeared from the system, as it's no longer in the default namespace
Device "enp3s1f0" does not exist.
Let's see if its reachable
OK
When a service is running in an alternate network namespace, it is possible to use the service's port on the host system, over all interfaces.
[1] 8556
$ curl http://0.0.0.0:8080
Foo
$ curl http://192.168.0.80:8080
OK
Services running in an alternate network namespace are unaffected by local firewall rules on the host system.
$ curl --max-time=3 http://0.0.0.0:8080
curl: (28) Connection timed out after 3001 milliseconds
$ curl http://192.168.0.80:8080
Associating the nginx service with the network namespace
I add PrivateNetworking=true to the [Service] section and the following lines to the [Unit] section of /usr/lib/systemd/system/nginx.service
Requires=webserver.service
After=webserver.service
JoinsNamespaceOf=netns@webserver.service
I then run sudo systemctl daemon-reload; sudo systemctl start nginx.service.
Let's test it out
<!doctype html>
<html>
<head>
<title>Nginx Server</title>
</head>
<body>
<h1>It Works!</h1>
</body>
</html>
Conclusion
A couple of final things to note. Network namespaces are a form of specific isolation - they only concern networking, not filesystems, user rights, etc. These partial isolation systems can be joined to form general isolation, this is how Docker and containerd operate. Systemd and the related technologies on a modern Linux system are extremely powerful and there's a lot of isolation that can be done within systemd service definitions, such as privilege and capability dropping, which will be covered in more detail in a later post.
Standalone use of network namespaces can be useful for situations when the only form of isolation required is on the networking side. For example, running a service (such as the transmission-daemon bittorrent) client over a VPN, without requiring a VPN on the rest of the system.
I hope you found this post informative
]]>#!/bin/bash
# File containing list of words (seperated by NL)
wordList='999-most-common-words.txt'
# Define the network range printed
subnet='192.168'
netwMin=0
netwMax=2
hostMin=2
hostMax=250
# Iterate and print
readarray words < <(printf "%s%s\n" $(shuf $wordList))
let "z=0";
for ((i=$netwMin; i<$netwMax; i++)); do
for ((y=$hostMin; y<$hostMax; y++)); do
printf "%s\t%s" "$subnet.$i.$y" "${words[$z]}";
let "z++";
done;
done;
Modifying the network ranges
Edit these to modify the network, by default, it generates 192.168.0.0/23
subnet='192.168'
netwMin=0
netwMax=2
hostMin=2
hostMax=250
Output
192.168.0.2	BoyRecognize
192.168.0.3	CharacterGrowth
192.168.0.4	SituationShot
192.168.0.5	ScienceDinner
192.168.0.6	HeavySend
192.168.0.7	WhenPrevent
192.168.0.8	ViewMarriage
192.168.0.9	SourceProvide
192.168.0.10	PerformMuch
192.168.0.11	AnotherDead
192.168.0.12	MusicPay
192.168.0.13	AirLast
192.168.0.14	LittleMouth
192.168.0.15	IfWonder
192.168.0.16	TeamShow
192.168.0.17	DirectionWall
192.168.0.18	CompanyThink
192.168.0.19	OrderOne
192.168.0.20	NeedHear
192.168.0.21	HighRadio
192.168.0.22	WhichCommercial
192.168.0.23	MilitaryDark
192.168.0.24	FamilyRemove
192.168.0.25	WhoseJust
192.168.0.26	OfficialProperty
192.168.0.27	ImageMember
192.168.0.28	FingerEarly
192.168.0.29	PerThree
192.168.0.30	SomeonePossible
192.168.0.31	IncreaseCoach
192.168.0.32	TreatAccording
192.168.0.33	BuildAlone
192.168.0.34	SexualThough
192.168.0.35	InvestmentOld
192.168.0.36	SaveSeries
192.168.0.37	TrainingMachine
192.168.0.38	OpportunityMessage
192.168.0.39	ResourceDiscover
192.168.0.40	BehaviorChoose
192.168.0.41	CourtIts
192.168.0.42	LikelyViolence
192.168.0.43	CanItself
192.168.0.44	FollowSeveral
192.168.0.45	EnjoyConference
192.168.0.46	FactorStandard
192.168.0.47	PushAbout
192.168.0.48	BeforeGive
192.168.0.49	WillHair
192.168.0.50	OrganizationFirm
192.168.0.51	AnyDifferent
192.168.0.52	ShootReceive
192.168.0.53	ShortThus
192.168.0.54	StreetForm
192.168.0.55	RaceItem
192.168.0.56	LotWithout
192.168.0.57	MomentNorth
192.168.0.58	CellRecent
192.168.0.59	HopePopulation
192.168.0.60	HundredAge
192.168.0.61	StudentTrip
192.168.0.62	BeatChance
192.168.0.63	SoonSport
192.168.0.64	ClassTelevision
192.168.0.65	RelationshipOther
192.168.0.66	DoOutside
192.168.0.67	RecentlyOf
192.168.0.68	ModernDie
192.168.0.69	ParticularBudget
192.168.0.70	ThanLeader
192.168.0.71	ChurchCheck
192.168.0.72	EventNational
192.168.0.73	RealAction
192.168.0.74	CenturyEvidence
192.168.0.75	ConcernOur
192.168.0.76	BoxTest
192.168.0.77	GovernmentPeople
192.168.0.78	ParentKnow
192.168.0.79	BetweenOfficer
192.168.0.80	CongressQuestion
192.168.0.81	DirectorSo
192.168.0.82	PositiveSchool
192.168.0.83	AlongCold
192.168.0.84	DevelopThing
192.168.0.85	OrAdmit
192.168.0.86	DetermineHelp
192.168.0.87	UnderstandCouple
192.168.0.88	AroundWater
192.168.0.89	MagazinePolitical
192.168.0.90	PassWhite
192.168.0.91	BehindHard
192.168.0.92	SiteWhat
192.168.0.93	NewsLocal
192.168.0.94	BackNever
192.168.0.95	ValueBit
192.168.0.96	BaseTrouble
192.168.0.97	TakeGoal
192.168.0.98	MethodInclude
192.168.0.99	DegreeNation
192.168.0.100	LieWhether
192.168.0.101	ImproveHow
192.168.0.102	LateAnimal
192.168.0.103	ReportFoot
192.168.0.104	LoseKind
192.168.0.105	InterestingBank
192.168.0.106	AttorneyOthers
192.168.0.107	WellAll
192.168.0.108	ThenPiece
192.168.0.109	HangNetwork
192.168.0.110	EightFuture
192.168.0.111	KnowledgeNatural
192.168.0.112	EndReally
192.168.0.113	TruthLand
192.168.0.114	ProveBecause
192.168.0.115	OnInside
192.168.0.116	ForeignAs
192.168.0.117	WhyInto
192.168.0.118	GrowDemocrat
192.168.0.119	MakePerson
192.168.0.120	BestSpeech
192.168.0.121	StateIndividual
192.168.0.122	RelateSouthern
192.168.0.123	WeaponTalk
192.168.0.124	WalkPoor
192.168.0.125	BloodSing
192.168.0.126	BillionGeneral
192.168.0.127	TooQuality
192.168.0.128	CareAlthough
192.168.0.129	EnvironmentEnergy
192.168.0.130	HourImagine
192.168.0.131	QuiteDifference
192.168.0.132	SummerLoss
192.168.0.133	DifficultUpon
192.168.0.134	FederalKey
192.168.0.135	PracticeProtect
192.168.0.136	SeasonAway
192.168.0.137	MotherThroughout
192.168.0.138	NoteLeg
192.168.0.139	WaitMyself
192.168.0.140	PullScore
192.168.0.141	SitNear
192.168.0.142	ReachResearch
192.168.0.143	BornThousand
192.168.0.144	SocialRemember
192.168.0.145	PositionSpecial
192.168.0.146	DespiteRich
192.168.0.147	EveryTogether
192.168.0.148	StyleSay
192.168.0.149	PastFirst
192.168.0.150	MindMiddle
192.168.0.151	PainHospital
192.168.0.152	PutClaim
192.168.0.153	TrialCatch
192.168.0.154	WeekAllow
192.168.0.155	EasyStore
192.168.0.156	DropWorker
192.168.0.157	AgreeSomebody
192.168.0.158	WithCost
192.168.0.159	QuicklyHeat
192.168.0.160	ExistGood
192.168.0.161	ThemLater
192.168.0.162	TownCamera
192.168.0.163	LowPersonal
192.168.0.164	ExecutiveMeeting
192.168.0.165	DescribeFood
192.168.0.166	FarExplain
192.168.0.167	ProduceCharge
192.168.0.168	ManagementTheory
192.168.0.169	TenWhole
192.168.0.170	AlwaysProduction
192.168.0.171	ActivityPartner
192.168.0.172	AlmostEffect
192.168.0.173	CivilAcross
192.168.0.174	StepWould
192.168.0.175	KitchenAgency
192.168.0.176	BusinessCapital
192.168.0.177	YoungFront
192.168.0.178	ContinueMy
192.168.0.179	TryIndustry
192.168.0.180	BabyLook
192.168.0.181	CreateReturn
192.168.0.182	HoweverDecide
192.168.0.183	HistoryYes
192.168.0.184	SuccessHouse
192.168.0.185	TableHusband
192.168.0.186	AndLong
192.168.0.187	ShareHead
192.168.0.188	IdentifySubject
192.168.0.189	ClearLegal
192.168.0.190	DiscussWorry
192.168.0.191	LetWord
192.168.0.192	SortDeep
192.168.0.193	SixPolitics
192.168.0.194	WeProblem
192.168.0.195	YearStar
192.168.0.196	FormerEat
192.168.0.197	ReflectBook
192.168.0.198	ResponseAddress
192.168.0.199	RoleFinal
192.168.0.200	StockSometimes
192.168.0.201	OnlyFall
192.168.0.202	TermYet
192.168.0.203	GreenShake
192.168.0.204	ReasonPrivate
192.168.0.205	HimDream
192.168.0.206	WhoLeave
192.168.0.207	BuyLife
192.168.0.208	DetailCall
192.168.0.209	ConsiderBlack
192.168.0.210	CurrentOil
192.168.0.211	NumberSuffer
192.168.0.212	SincePaper
192.168.0.213	ManageMeasure
192.168.0.214	DrawTonight
192.168.0.215	GirlSecurity
192.168.0.216	DoctorAdd
192.168.0.217	FiveEconomy
192.168.0.218	LearnSurface
192.168.0.219	StructureSimilar
192.168.0.220	TimeSerious
192.168.0.221	GlassAbility
192.168.0.222	WeightTrade
192.168.0.223	MarketReality
192.168.0.224	UnderOnce
192.168.0.225	ClearlyWrong
192.168.0.226	AgainstDuring
192.168.0.227	PlayerCar
192.168.0.228	StartBelieve
192.168.0.229	CulturalComputer
192.168.0.230	MemoryElection
192.168.0.231	WhileArgue
192.168.0.232	OwnerProbably
192.168.0.233	TraditionalPresent
192.168.0.234	ToughSupport
192.168.0.235	CouldHuman
192.168.0.236	ThatEither
192.168.0.237	MovieLead
192.168.0.238	FinancialPoint
192.168.0.239	WantEffort
192.168.0.240	RoomName
192.168.0.241	MrSister
192.168.0.242	LeftMajor
192.168.0.243	NearlyAccount
192.168.0.244	EveningEverything
192.168.0.245	EnterLetter
192.168.0.246	DeathSide
192.168.0.247	GreatEver
192.168.0.248	HoldStation
192.168.0.249	ProfessionalGo
192.168.1.2	EnoughPlan
192.168.1.3	CampaignField
192.168.1.4	DecisionDefense
192.168.1.5	SuccessfulSection
192.168.1.6	IdeaEveryone
192.168.1.7	RatherReduce
192.168.1.8	SexEntire
192.168.1.9	BrotherAt
192.168.1.10	NewApply
192.168.1.11	RuleHuge
192.168.1.12	NightAuthor
192.168.1.13	SeatCover
192.168.1.14	ToAudience
192.168.1.15	JobCompare
192.168.1.16	OccurSenior
192.168.1.17	AvailableTop
192.168.1.18	SomePolice
192.168.1.19	StuffMrs
192.168.1.20	ExpertDown
192.168.1.21	FreeProfessor
192.168.1.22	IChoice
192.168.1.23	HimselfPublic
192.168.1.24	AgreementCard
192.168.1.25	LayBegin
192.168.1.26	EspeciallyHand
192.168.1.27	UsuallyAppear
192.168.1.28	SingleAgent
192.168.1.29	TheirAbove
192.168.1.30	ItPlay
192.168.1.31	WomanRate
192.168.1.32	InformationNice
192.168.1.33	CertainlyCollege
192.168.1.34	RaiseArm
192.168.1.35	FullHere
192.168.1.36	WayCut
192.168.1.37	FinishCome
192.168.1.38	EdgeEast
192.168.1.39	TellTree
192.168.1.40	AnythingMean
192.168.1.41	HeartMore
192.168.1.42	UpSuch
192.168.1.43	CultureCommunity
192.168.1.44	SeekOnto
192.168.1.45	LanguageVoice
192.168.1.46	ColorMan
192.168.1.47	SenseEverybody
192.168.1.48	PatternSee
192.168.1.49	CarryPlant
192.168.1.50	ConditionTurn
192.168.1.51	WideBe
192.168.1.52	DemocraticDecade
192.168.1.53	KidPurpose
192.168.1.54	PowerThere
192.168.1.55	CenterWestern
192.168.1.56	ExactlyPressure
192.168.1.57	CustomerKeep
192.168.1.58	ResponsibilityCity
192.168.1.59	TowardWin
192.168.1.60	MentionSure
192.168.1.61	SomethingBecome
192.168.1.62	WorldAnyone
192.168.1.63	SpecificCrime
192.168.1.64	ArticleBody
192.168.1.65	ChangeNot
192.168.1.66	FindMust
192.168.1.67	WifeBad
192.168.1.68	BeyondBig
192.168.1.69	FineStatement
192.168.1.70	WindowTreatment
192.168.1.71	BreakExample
192.168.1.72	DealPretty
192.168.1.73	CareerAlso
192.168.1.74	AbleDoor
192.168.1.75	FourWrite
192.168.1.76	CollectionCase
192.168.1.77	PartyShould
192.168.1.78	ThreatPerformance
192.168.1.79	PictureAmerican
192.168.1.80	DevelopmentMaintain
192.168.1.81	EnvironmentalNothing
192.168.1.82	ThirdMatter
192.168.1.83	ExperienceLess
192.168.1.84	RiseSystem
192.168.1.85	EachEye
192.168.1.86	ResultWork
192.168.1.87	DiseasePrice
192.168.1.88	HomeHappen
192.168.1.89	FearStory
192.168.1.90	StrongSecond
192.168.1.91	IndeedRed
192.168.1.92	FactWest
192.168.1.93	AgainCause
192.168.1.94	SpendTeach
192.168.1.95	BetterLawyer
192.168.1.96	LawAnalysis
192.168.1.97	ListenVarious
192.168.1.98	BeautifulPeriod
192.168.1.99	FatherRecord
192.168.1.100	StudyKill
192.168.1.101	CountryBoard
192.168.1.102	SuddenlyAffect
192.168.1.103	SignRisk
192.168.1.104	HaveSound
192.168.1.105	WarAccept
192.168.1.106	YouFeel
192.168.1.107	CancerReligious
192.168.1.108	BarSong
192.168.1.109	InvolveLine
192.168.1.110	SouthFast
192.168.1.111	SocietySon
192.168.1.112	DesignMaterial
192.168.1.113	BlueForget
192.168.1.114	OhExpect
192.168.1.115	CourseStay
192.168.1.116	GuessMiss
192.168.1.117	FigureRemain
192.168.1.118	ByAsk
192.168.1.119	WatchOwn
192.168.1.120	UsAmong
192.168.1.121	MonthPainting
192.168.1.122	RangePhysical
192.168.1.123	NatureApproach
192.168.1.124	DayBill
192.168.1.125	CupVote
192.168.1.126	DrugOperation
192.168.1.127	SetCentral
192.168.1.128	MediaWriter
192.168.1.129	FilmTravel
192.168.1.130	TheEducation
192.168.1.131	PartPM
192.168.1.132	HappyShe
192.168.1.133	StandChild
192.168.1.134	FewSpring
192.168.1.135	OfficeInstead
192.168.1.136	PopularSea
192.168.1.137	SpeakVisit
192.168.1.138	GroundLove
192.168.1.139	LevelThemselves
192.168.1.140	SignificantServe
192.168.1.141	AnswerAct
192.168.1.142	OverYard
192.168.1.143	ThoseWind
192.168.1.144	FlyNo
192.168.1.145	OpenGame
192.168.1.146	InterestYourself
192.168.1.147	PrepareYour
192.168.1.148	TwoHis
192.168.1.149	FillHealth
192.168.1.150	NewspaperIn
192.168.1.151	OptionRight
192.168.1.152	AdministrationOffer
192.168.1.153	GetAttention
192.168.1.154	PeaceGeneration
192.168.1.155	TaxSimply
192.168.1.156	ForwardInternational
192.168.1.157	SkillEconomic
192.168.1.158	HotShoulder
192.168.1.159	BuildingLike
192.168.1.160	AreaToday
192.168.1.161	OffThrough
192.168.1.162	SpaceTV
192.168.1.163	VictimRun
192.168.1.164	ImpactRead
192.168.1.165	ThrowMany
192.168.1.166	MeetImportant
192.168.1.167	ScientistMission
192.168.1.168	ProjectContain
192.168.1.169	ProductBall
192.168.1.170	PresidentNow
192.168.1.171	FinallyHer
192.168.1.172	StopOut
192.168.1.173	SellFail
192.168.1.174	DriveMoney
192.168.1.175	WishStaff
192.168.1.176	FireBag
192.168.1.177	HeAhead
192.168.1.178	TaskTechnology
192.168.1.179	LargeMinute
192.168.1.180	OkFocus
192.168.1.181	WearProgram
192.168.1.182	ActuallySoldier
192.168.1.183	LaughType
192.168.1.184	BedEmployee
192.168.1.185	WhereDaughter
192.168.1.186	ChairOften
192.168.1.187	RegionEstablish
192.168.1.188	SceneBring
192.168.1.189	ControlSimple
192.168.1.190	TendGun
192.168.1.191	PageMight
192.168.1.192	GasFish
192.168.1.193	PatientThought
192.168.1.194	MorningHit
192.168.1.195	CloseFloor
192.168.1.196	ChallengeMedical
192.168.1.197	LeastMain
192.168.1.198	MoveTeacher
192.168.1.199	VeryMay
192.168.1.200	AgoRepresent
192.168.1.201	ForData
192.168.1.202	NextMost
192.168.1.203	ProcessAssume
192.168.1.204	SizeService
192.168.1.205	ThisList
192.168.1.206	HotelFeeling
192.168.1.207	AdultCitizen
192.168.1.208	SevenAlready
192.168.1.209	BothPerhaps
192.168.1.210	PhoneAuthority
192.168.1.211	SameGarden
192.168.1.212	LightSkin
192.168.1.213	BenefitHalf
192.168.1.214	PlaceNecessary
192.168.1.215	RevealN'T
192.168.1.216	ElseArtist
192.168.1.217	AmountSafe
192.168.1.218	TheyParticularly
192.168.1.219	MovementFrom
192.168.1.220	CommonHerself
192.168.1.221	RoadCertain
192.168.1.222	TrueFace
192.168.1.223	ParticipantMaybe
192.168.1.224	InterviewUntil
192.168.1.225	GroupStage
192.168.1.226	ConsumerNotice
192.168.1.227	InstitutionCandidate
192.168.1.228	ArtJoin
192.168.1.229	IssueEven
192.168.1.230	AttackFight
192.168.1.231	WithinStrategy
192.168.1.232	WhomPolicy
192.168.1.233	RockWhatever
192.168.1.234	FundStill
192.168.1.235	MillionDiscussion
192.168.1.236	YeahDog
192.168.1.237	RequireLive
192.168.1.238	ButMajority
192.168.1.239	NorRealize
192.168.1.240	NoneSuggest
192.168.1.241	RespondGuy
192.168.1.242	SeemUse
192.168.1.243	ReadyMe
192.168.1.244	FriendThank
192.168.1.245	PickDebate
192.168.1.246	SmallSmile
192.168.1.247	TheseIndicate
192.168.1.248	AvoidModel
192.168.1.249	ArriveIncluding
Sources
1000 most common words in English - https://www.ef.co.nz/english-resources/english-vocabulary/top-1000-words/
]]>
The Python Script
The script uses the Python requests library to contact the server. If the server is unreachable, returns an http error, or fails to respond within the timeout (5s for my site) the script runs the sendxmpp command (the configuration of which will be covered later in this article).
The script takes two arguments
1. The URL to monitor
2. The address to send the message to
Systemd User Timers
Systemd is a major component of most modern Linux distributions, replacing older utilities such as cron and init. Systemd is used to run services and schedule tasks.
Services can be defined and activated on a per-user basis allowing automation without using the root account.
In my distribution, Fedora, user-specific systemd configuration files reside in $HOME/~.config/systemd/user. You may need to create the directory.
Begin by defining a definition in $HOME/.config/systemd/user/check-website.service. This is what calls the python script.
Don't forget to substitute the example.etherarp.net values with ones applicable to you!.
The next required file is $HOME/.config/systemd/user/check-website.timer which specifies that check-website.service be run at regular intervals
This timer definition states the service will run every ten minutes, provided the system has been up for fifteen minutes (it will run immediately if the timer is manually started)
Run the following commands to activate the timer
systemctl --user daemon-reload
systemctl --user enable check-website.timer
systemctl --user start  check-website.timer
Configure the XMPP client
I decided to use the old Perl based sendxmpp command as my XMPP client because it is extremely simple.
It does have a couple of fairly major flaws:
- It doesn't understand
DNS SRVrecords - Fedora had SSL verification issues (which I fixed)
First, in my home directory, I created a ~/.sendxmpprc file with the following entries specific to my (test) XMPP server
username: test
component: example.etherarp.net
jserver: example.etherarp.net:5222
password: Password!
When I tried running `sendxmpp` on Fedora, I got a fatal SSL error as it couldn't find a CA bundle. I fixed it by editing
/usr/share/perl5/vendor_perl/XML/Stream.pm and looking for the line matching $self->{SIDS}->{default}->{ssl_ca_path} = '';
and changing '' to '/etc/pki/tls/certs/ca-bundle.crt'
On the topic of SSL, the Python script calls sendxmpp with the -t flag which mandates the use of TLS. Remove this flag if you're using a plaintext server.
Configure the XMPP Server
I created a test XMPP server using the prosody package running on a Debian in a Docker container. As this was a quick test, I set it up interactively rather than using a Dockerfile.
I copied a valid SSL certificate/key/dh2048 to it and placed the following in /etc/prosody/prosody.cfg.lua
I started prosody, and then used prosodyctl adduser test@example.etherarp.net and prosodyctl adduser webmaster@example.etherarp.net commands to generate the user and service XMPP accounts.
Then, on my workstation, I set example.etherarp.net to the address of the container in /etc/hosts. I connected over Pidgin client and logged into both accounts, adding and accepting both as 'buddies' of one and other.
I then verified messages could be sent between them
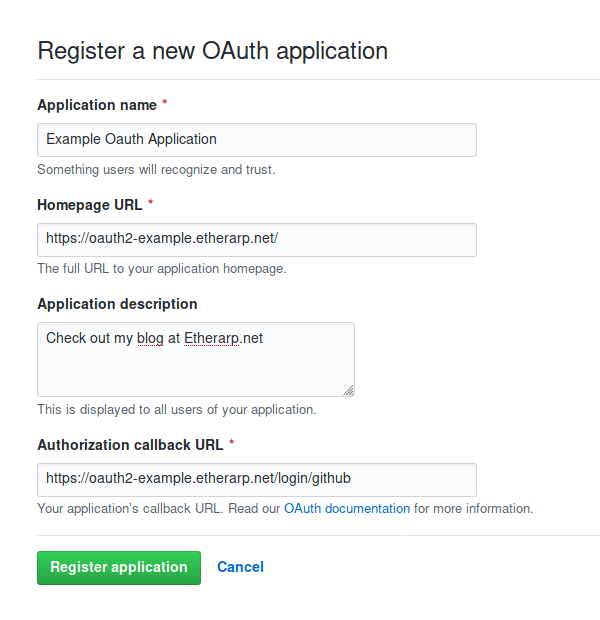
]]>http.jwt and http.login are required. Create an Oauth2 App in Github
Log into your Github account and open Developer Settings.
Create a new Oauth2 App, set https://<domain>/login/github as the Authorization Callback URL
Install Caddy
Using Oauth2 requires the http.login and http.jwt plugins, which are not included by default. There are a number of ways to build Caddy - I used the Dockerfile below. To build, run the following command docker build . -t local/caddy. You will need a Caddyfile and index.html in your working directory.
Once Caddy has been built, it can be started using docker-compose.
Configure Caddy
This is the Caddyfile. All requests to / are redirected to /login. On successful Oauth2 verification, the user is redirected to /internal/index.html. The sub statement specifies the authorized Github accounts (by username)
Trying it out
In a private window, I open up my site, and as expected, it redirects to the login page

The sign in link points to a login page on the Github.com domain
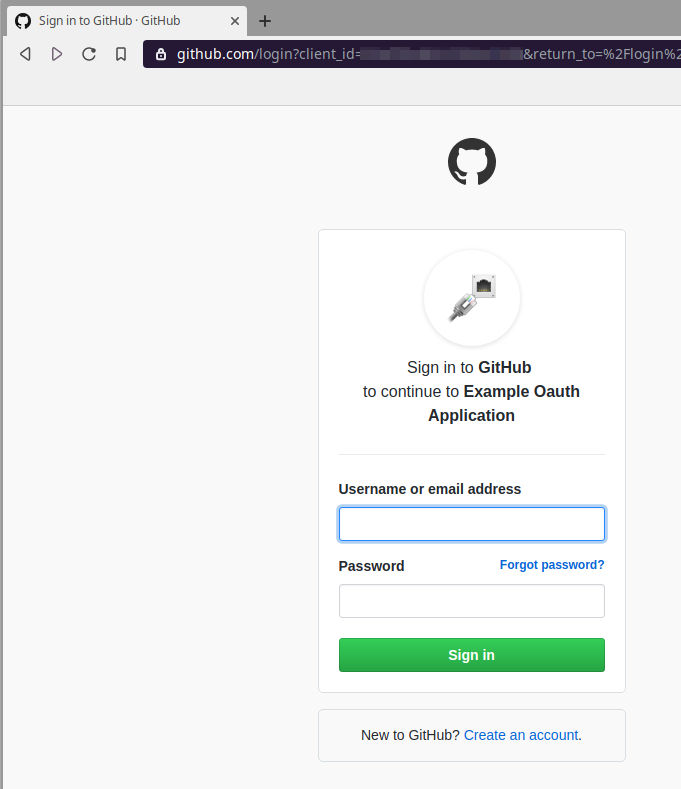
The first time you log in, you will have to associate the Oauth2 App with your Github account; only associate your account with sites you consider trustworthy!
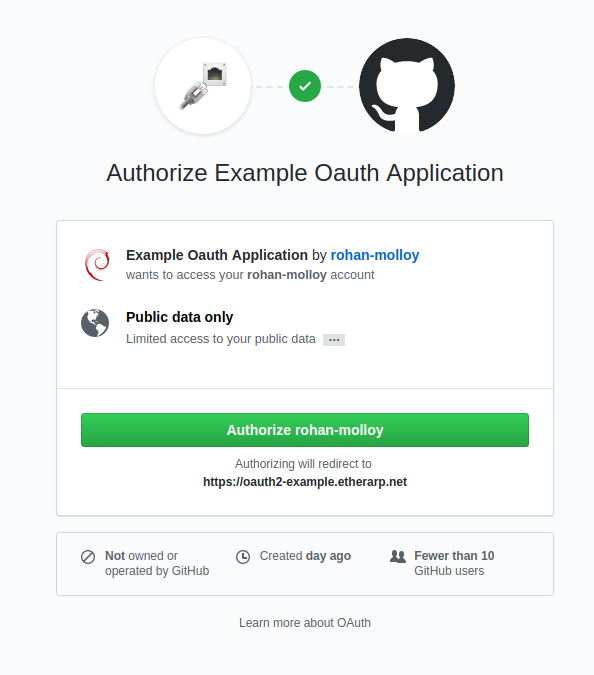
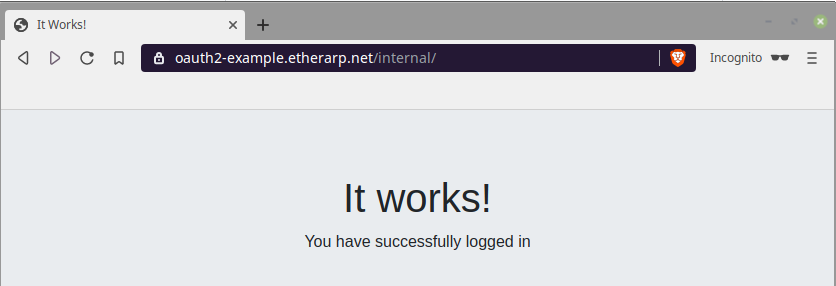
Upon authorization, you will be redirected to the site's internal area.
Service
Install and enable Firewalld
$ apt-get install firewalld firewall-cmd
$ systemctl enable firewalld
$ systemctl start firewalld
Check if firewalld is active
$ firewall-cmd --state
running
Make current rules persistent
$ firewall-cmd --runtime-to-permanent
$ firewall-cmd --reload
Reload the firewall
$ firewall-cmd --reload
Interfaces
Get zone of interface
$ firewall-cmd --get-zone-of-interface tun0
external
Remove an interface from a zone
$ firewall-cmd --zone=external \
               --remove-interface tun0
Add an interface to a zone
$ firewall-cmd --zone=internal \
               --add-interface tun0
Zones
Get zone names
$ firewall-cmd --get-zones
FedoraServer FedoraWorkstation block dmz drop external home internal public trusted work
Get default zone
$ firewall-cmd --get-default-zone
public
Change the default zone
$ firewall-cmd --set-default-zone external
Adding a service to a zone
$ firewall-cmd --zone=home \
               --add-service ssh
Adding a source IP to a zone
$ firewall-cmd --zone=home \
               --add-source 203.0.113.224/27
Adding a source MAC to a zone
$ firewall-cmd --zone=trusted \
               --add-source 5a:c2:5c:02:f3:e9
Get active zones
$ firewall-cmd --get-active-zones
external
 interfaces: ens3
home
 sources: 203.0.113.224/27
internal
 interfaces: tun0
Describe all zones and rules
$ firewall-cmd --list-all-zones
external (active)
  target: default
  icmp-block-inversion: no
  interfaces: ens3
  sources:
  services: openvpn
  ports:
  protocols:
  masquerade: yes
  forward-ports:
  source-ports:
  icmp-blocks:
  rich rules:

home (active)
  target: default
  icmp-block-inversion: no
  interfaces:
  sources: 203.0.113.224/27
  services: cockpit ssh
  ports:
  protocols:
  masquerade: no
  forward-ports:
  source-ports:
  icmp-blocks:
  rich rules:

internal (active)
  target: default
  icmp-block-inversion: no
  interfaces: tun0
  sources:
  services: http https ssh cockpit dns
  ports:
  protocols:
  masquerade: no
  forward-ports:
  source-ports:
  icmp-blocks:
  rich rules:
Using the drop and trusted zone
Firewalld includes a special zone known as trusted that will unconditionally allow traffic.
“Trusted” sources or interfaces can be added to this zone.
$ firewall-cmd --zone trusted \
               --add-source 172.28.29.30 \

$ firewall-cmd --zone trusted \
               --add-interface virbr3
Firewalld also includes a drop zone which can be used to unconditionally drop traffic from specific interfaces or source addresses
$ firewall-cmd --zone drop \
               --add-source 169.254.0.0/16
Clear services from zones
Firewalld is preinstalled with a default configuration for every zone. For example, the home zone includes services such as samba and mDNS. I prefer starting with a clean slate. The command below will clear every service from every zone. Be careful not to lock yourself out!
for zone in $(firewall-cmd --get-zones); do firewall-cmd \
--list-services --zone=$zone | xargs -n1 firewall-cmd \
--zone=$zone --remove-service; done
Rich rules
Allow any traffic from source address
This rule allows any traffic with a source address of 10.20.30.40.
This rule only applies to sources/interfaces in the internal zone
$ firewall-cmd --zone=internal \
               --add-rich-rule 'rule
                                family=ipv4
                                source address=10.20.30.40
                                accept'
Allow service from source address
This rule allows SSH if the source address is 192.0.2.111
This rule only applies to sources/interfaces in the external zone
$ firewall-cmd --zone=external \
               --add-rich-rule 'rule
                                family=ipv4
                                service name=ssh
                                source address=192.0.2.111
                                accept'
Allow traffic to destination address and port
This rule allows traffic to port 1194/udp if the destination address is 198.51.100.123.
This rule applies to the default zone
$ firewall-cmd --add-rich-rule 'rule
                                family=ipv4
                                protocol=udp port=1194
                                destination address=198.51.100.123
                                accept'
Allow a service with rate-limit
$ firewall-cmd --add-rich-rule='rule
                                service name=ssh
                                limit value=10/m
Accept a service and log (with ratelimit)
$ firewall-cmd --add-rich-rule='rule
                                family=ipv4
                                service name=ssh
                                log prefix=ssh
                                level=info
                                limit value=3/m
                                accept
IPset
Define a new ipset
$ firewall-cmd --permanent \
               --new-ipset china
               --type hash:net
Add an ipset from XML file
$ firewall-cmd --permanent \
               --new-ipset-from-file=china.netset.xml \
               --name=china \
Add ipset entries from file
$ firewall-cmd --permanent \
               --ipset china \
               --add-entries-from-file ip2location_country_cn.netset
Block sources by ipset
$ firewall-cmd --permanent \
               --zone=drop \
               --source ipset:china
Find the XML file containing ipset
$ firewall-cmd --permanent --path-ipset china
/etc/firewalld/ipsets/china.xml
Miscellaneous
Time-limited rules
Using the timeout option, it is possible to set a maximum lifetime of a rule; the rules below will be automatically deleted after 60s
$ firewall-cmd --timeout 60 \
               --add-service https

$ firewall-cmd --timeout 60 \
               --add-rich-rule 'rule family=ipv4
                                source address=10.122.4.20
                                accept'
Adding traditional iptables rules
$ firewall-cmd --permanent \
               --direct \
               --add-rule ipv4 filter FORWARD 1 -i tun+ -d 10.0.0.0/8 -j DROP
Configure NAT masquerading
$ firewall-cmd --zone=external \
               --add-masquerade
Configure port forwarding
 $ firewall-cmd --zone=external \
                --add-forward-port 'port=8080:proto=tcp:toport=80:toaddr=10.10.10.10'
This sounds a bit confusing, but it's really just an extension of the SSH LocalForward option. To illustrate, suppose we have Host1 which shares an internal network with Host2. If we wanted to access Host2, we could do the following:
SSH ProxyJump simplifies this process, so that we can do the above in one line ssh host2user@host2 -J host1
Defining Jump Hosts in ~/.ssh/config
This feature is most powerful when ProxyJumps are defined in ~/.ssh/config because any SSH features (like port-forwarding or SCP) can be used through a jump host.
With this definition, every SSH connection to 'host2' will go through host1. Resolution of the hostname will be performed on host1. If custom options for host1 (such as a different port or user) are required, add an above entry in ~/.ssh/config
We can also add wildcard entries, like this
Chaining ProxyJump Entries
Host1 is reachable. Host2 is only reachable via Host1. Host3 is only reachable via Host2
Note: Hostname resolution is performed on the jump host. 'host2' must resolve correctly on host1, and host3 must resolve correctly on host2.
This problem can be solved by adding IP addresses as the hostnames in your local ~/.ssh/config.
Creating a locked down account for JumpHosts
Add the above to /etc/ssh/sshd_config to restrict the user sshjumpsa as a jump host service account. The PermitOpen statement is a whitelist of allowed upstream destinations. The match is string/regex based, so adding a hostname does not permit requests that use the corresponding IP.
To create the service account, use the following commands:
Locked Down Access in ~/.ssh/authorized_keys
It is also possible to define locked-down access for a particular public key in ~/.ssh/authorized_keys.
In the example below, the public key can open ssh connections to host2 and host3:22; access is only allowed from 203.0.113.0/24 (the from= statement is optional)
The proxy frontend will be handled with Caddy. Caddy is a very elegent web server, with a sucicent configuration syntax, automatic LetsEncrypt, and security focused default settings.
This post is a refinement of Setting up Ghost 2.0 With Cloudflare (November 24th, 2018)
Copying the volumes
All the persistent data on the old server is stored in docker volumes, which are directories on the local file system. First, shutdown the containers with docker-compose down and scp. The main working directory will be /srv/etherarp
Creating the new Docker compose file
This docker-compose file defines the three containers, db, www, ghost. The Ghost and Mariadb backend containers are in an internal-only network, while the Caddy frontend has two networks, internal and external.
Variables (in the form of ${vars}) are sourced from /srv/etherarp.net/.env. This contains the SQL credentials, SSL certificate paths, and external address bindings. The Docker host will host a number of origin servers, so each web facing container is bound to its own specific IPv6 address. Public access is provided through Cloudflare.
Configuring the Caddyfile
Configuring a systemd service
The stack can be controlled as a service using systemd. The systemd unit creates and destroys the IPv6 addresses, and calls Docker-compose. The preferred_lft 0 option is used when adding the address to prevent it being used as a default source address.
Firewall
Next, firewalld needs to be configured to allow access to https from the Cloudflare edge. This is achieved with the above script. To allow public https access for a different address, the following firewalld rich rule can be used.
firewall-cmd --add-rich-rule \
"rule family=ipv6 port
protocol=tcp port=443
destination address=$addr
accept"
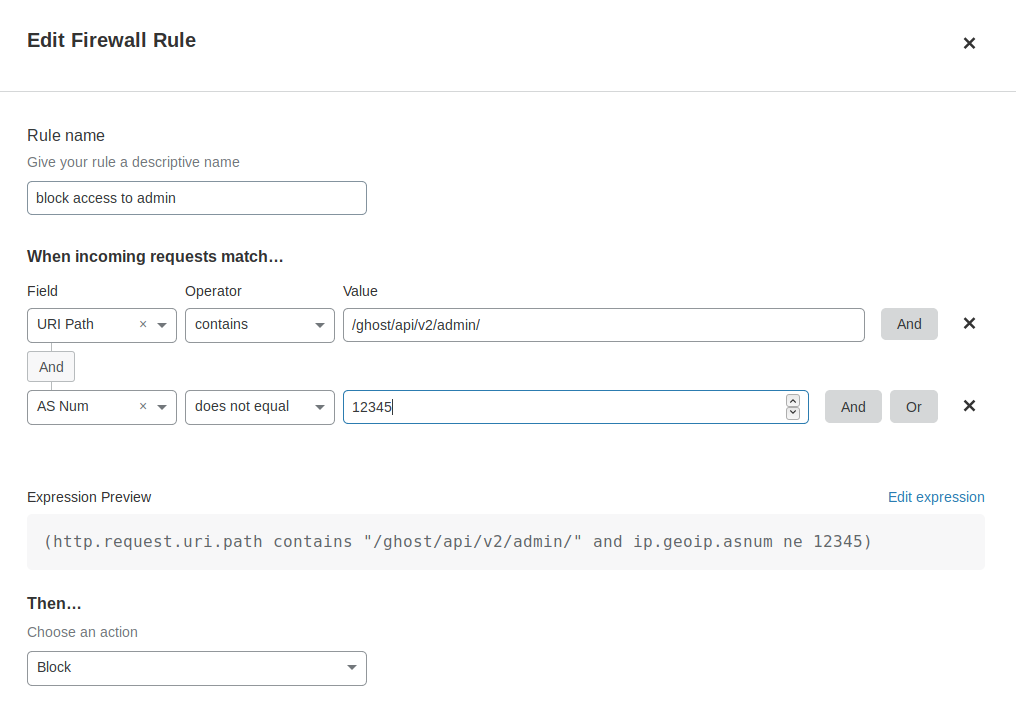
I also add and remove additional rules to tightly restrict both in and outbound traffic. This is done both on the system and via the cloud provider console. On the topic of firewalls, it's a good time to check the Cloudflare settings for the site. I make sure the admin interface/API isn't accessible to the public internet
Wrapping up
At this point, all that's left to do is run systemctl start etherarp.service; systemctl enable etherarp.service.
To check it's working, we can run curl --resolve etherarp.net:[$ip6addr] https://etherarp.net.
Once the local instance is tested and working, it's time for the moment of truth, via Cloudflare, the DNS records are changed to the new server. If you're able to read this post, it means everything went smoothly.
Amazon Route53 offers hosting for public DNS as well as private DNS for use within the cloud.
I really like the Amazon AWS API. I prefer it to Cloudflare for Dynamic DNS because Route53 provides granual API access (you can generate a key that can only update a single domain) while Cloudflare has a single API key unrestricted privileges.
The Script
IAM policies for Service account
Begin by going to the IAM console at https://console.aws.amazon.com/iam/home and click on Create Policy. Add the following JSON
Then create a group and attach the policy to the group. Finally, create a user, assign it to the group, and download its credentials.
Creating a RESTful API
I have a number of small devices (like routers) that don't have a proper python environment. I want a dynamic dns solution that can be accessed purely with curl. Using Flask, it is possible to host the python script as a service!.
Clients connect to it, and the script runs on the server, updating the records with the clients ip.
Securing it
I'm still new to Flask, so didn't have time to learn how to set up HTTP basic authentication. I used an ad-hoc solution, the API endpoint is defined by an environment variable, which can be set to some random string.
Access control can also be set up with a reverse proxy (e.g. nginx/caddy) but this is outside of the scope of this tutorial.
The service also uses TLS (https). To easily generate LetsEncrypt certs for your local environment, see my tutorial
]]>