This post will cover how I got connected to dn42. dn42 stands for Decentralized Network 42. It is an interconnected network that employs the same technology (DNS, BGP, etc) as the internet. This provides a great opportunity to replicate the processes used by real ISPs peering on the internet.
Part 1: Registering objects
On the public internet, regional internet registries (RIRs) operate a database of maintainers, persons and prefixes and autonomous systems. Autonomous systems are networks maintained by a single entity and are assigned numbers (ASNs) and a portion of the IP address space (prefixes). DN42 operates a single registry that is hosted on Git.
We begin by registring an account on their Gitea site. The user name you pick will identify you on DN42.
Clone down the registry repository and create a feature branch in the format etherarp-20211103/register (replacing etherarp and the date with the appropriate values).
We need to create mntner, person, route, inetnum, autnum objects. You can look at my pull request to see the formats. We can use the following tools to find available ASNs and IP ranges.
You also need to sign your commit with a key that is specified in the auth field of the mntner object. I opted to use an SSH key for two reasons
1. It's what I had on hand
2. It can be used to grant me access to servers on DN42
We then sign the commit by getting the commit hash and running the following command to get a signature (which we place in the text on the pull request)
echo $COMMIT_HASH | ssh-keygen -Y sign -f ~/.ssh/id_ed25519 -n dn42
Part 2: Setting up infrastructure
I decided to host my network on Vultr cloud. I created two instances
1. VyOS router (you can find it in the ISO section
2. Debian client
Make sure you tick private networking for both instances.
The VyOS router will not boot up with an IP addresses, we have to manually configure it in the console to set up internet connectivity and SSH. When setting up SSH, it's a good idea to temporarily enable the Cloud firewall from your provider. Once passwords and host firewall rules have been set, we may disable it to prevent any connectivity issues with our peers.
I use the following commands to set up my VyOs router
# Define my home network for the firewall
set firewall group network-group HOME network '203.0.113.0/24'

# Create an IPv6 firewall (for the internet)
set firewall ipv6-name WANv6_LOCAL default-action 'accept'
set firewall ipv6-name WANv6_LOCAL rule 1 action 'reject'
set firewall ipv6-name WANv6_LOCAL rule 1 description 'Reject-All-SSH'
set firewall ipv6-name WANv6_LOCAL rule 1 destination port 'ssh'
set firewall ipv6-name WANv6_LOCAL rule 1 protocol 'tcp'

# Define an IPv4 firewall (for the internet)
# Allow SSH from home; block bgp and dns
set firewall name WANv4_LOCAL default-action 'accept'
set firewall name WANv4_LOCAL rule 1 action 'accept'
set firewall name WANv4_LOCAL rule 1 description 'Allow-Home-SSH'
set firewall name WANv4_LOCAL rule 1 destination port 'ssh'
set firewall name WANv4_LOCAL rule 1 protocol 'tcp'
set firewall name WANv4_LOCAL rule 1 source group network-group 'HOME'
set firewall name WANv4_LOCAL rule 2 action 'reject'
set firewall name WANv4_LOCAL rule 2 description 'Reject-All-SSH'
set firewall name WANv4_LOCAL rule 2 destination port 'ssh'
set firewall name WANv4_LOCAL rule 2 protocol 'tcp'
set firewall name WANv4_LOCAL rule 3 action 'reject'
set firewall name WANv4_LOCAL rule 3 description 'Reject-All-DNS'
set firewall name WANv4_LOCAL rule 3 destination port 'domain'
set firewall name WANv4_LOCAL rule 3 protocol 'tcp_udp'
set firewall name WANv4_LOCAL rule 4 action 'reject'
set firewall name WANv4_LOCAL rule 4 description 'Reject-All-BGP'
set firewall name WANv4_LOCAL rule 4 destination port 'bgp'
set firewall name WANv4_LOCAL rule 4 protocol 'tcp'

# Set the primary interface to use DHCP
# Bind it to the firewall
set interfaces ethernet eth0 address 'dhcp'
set interfaces ethernet eth0 firewall local ipv6-name 'WANv6_LOCAL'
set interfaces ethernet eth0 firewall local name 'WANv4_LOCAL'

# Create a password for your user
set system login user vyos authentication plaintext-password 'hunter2'

# Define an ssh key for your user
set system login user vyos authentication public-keys workstation key 'REPLACE-WITH-YOUR-KEY'
set system login user vyos authentication public-keys workstation type 'ssh-ed25519'

# Enable SSH
set service ssh
Part 3: Finding a peer
I chose to peer with JLU5 who operates multiple points of presence to DN42. This required setting up a Wireguard VPN.
I began by generating my keys. I found on my version of VyOS I had issues with directories missing so I had to create them prior to generating my keys. I used the following commands
sudo mkdir -p /config/auth/wireguard
sudo chown -R vyos /config/auth/wireguard
generate wireguard keypair
show wireguard pubkey
Now that we have the keys generated, we can begin setting up the VPN
# Set an inbound firewall for Wireguard traffic
set firewall name WGv4_LOCAL default-action 'accept'
set firewall name WGv4_LOCAL rule 1 action 'reject'
set firewall name WGv4_LOCAL rule 1 description 'Reject-All-SSH'
set firewall name WGv4_LOCAL rule 1 destination port 'ssh'
set firewall name WGv4_LOCAL rule 1 protocol 'tcp'

# Define the wireguard interface (use the first host IP of your prefix)
set interfaces wireguard wg1 address '172.21.99.225/32'
set interfaces wireguard wg1 description 'DN42 Peering'
set interfaces wireguard wg1 firewall local name 'WGv4_LOCAL'

# Your local port for Wireguard
# This must be open from the internet
set interfaces wireguard wg1 port '51820'

# Define your Peer
set interfaces wireguard wg1 peer dn42-us-lax01.jlu5.com allowed-ips '0.0.0.0/0'
set interfaces wireguard wg1 peer dn42-us-lax01.jlu5.com endpoint '185.198.26.55:21678'
set interfaces wireguard wg1 peer dn42-us-lax01.jlu5.com pubkey 'H5XoB+8N4LoMAW4+vJ2jD6fO5vqQGZdj4MSip5clcCg='

# Your peers IP address goes here
set protocols static interface-route 172.20.229.122/32 next-hop-interface wg1
Next we email our peer with our public key, external IP, port, and the internal IP we have assigned to the wireguard interface.
We can then confirm the tunnel is up by pinging our peer
vyos@vyos:~$ ping 172.20.229.122
PING 172.20.229.122 (172.20.229.122) 56(84) bytes of data.
64 bytes from 172.20.229.122: icmp_seq=1 ttl=64 time=0.818 ms
64 bytes from 172.20.229.122: icmp_seq=2 ttl=64 time=0.871 ms
64 bytes from 172.20.229.122: icmp_seq=3 ttl=64 time=0.782 ms
^C
--- 172.20.229.122 ping statistics ---
3 packets transmitted, 3 received, 0% packet loss, time 2025ms
rtt min/avg/max/mdev = 0.782/0.823/0.871/0.049 ms
Part 4: Configuring BGP
Now we have established a tunnel with our peer, we can announce our ASN and prefix over BGP. BGP is known as the Border Gateway Protocol and is used by ISPs and large networks to exchange routing information over the internet
When configuring BGP, the two most crucical details are your local autonomous systems number and your peer's autonomous system number.
The below BGP configuration uses route maps to filter the prefixes that can be shared to (export) or learned from (import) with our neighbour. In this scenario, we only want to exchange routes that are related to DN42!
# Configure my local BGP Parameters
set protocols bgp 4242421678 address-family ipv4-unicast network 172.21.99.224/27
set protocols bgp 4242421678 parameters router-id 172.21.99.225

# Define the DN42 Network
set policy prefix-list DN42-Network rule 10 action 'permit'
set policy prefix-list DN42-Network rule 10 le '32'
set policy prefix-list DN42-Network rule 10 prefix '172.20.0.0/14'
set policy prefix-list DN42-Network rule 20 action 'permit'
set policy prefix-list DN42-Network rule 20 le '32'
set policy prefix-list DN42-Network rule 20 prefix '10.0.0.0/8'
set policy prefix-list6 DN42-Network-v6 rule 10 action 'permit'
set policy prefix-list6 DN42-Network-v6 rule 10 le '128'
set policy prefix-list6 DN42-Network-v6 rule 10 prefix 'fd00::/8'

# Configure the route map for DN42 prefixes
set policy route-map Default-Peering rule 20 action 'permit'
set policy route-map Default-Peering rule 20 description 'Allow DN42-Network'
set policy route-map Default-Peering rule 20 match ip address prefix-list 'DN42-Network'
set policy route-map Default-Peering rule 21 action 'permit'
set policy route-map Default-Peering rule 21 description 'Allow DN42-Network'
set policy route-map Default-Peering rule 21 match ip address prefix-list6 'DN42-Network-v6'
set policy route-map Default-Peering rule 99 action 'deny'

# Peer with JLU5
set protocols bgp 4242421678 neighbor 172.20.229.122 remote-as 4242421080
set protocols bgp 4242421678 neighbor 172.20.229.122 ebgp-multihop '20'

# Apply route filtering to my neighbour
set protocols bgp 4242421678 neighbor 172.20.229.122 address-family ipv4-unicast route-map export 'Default-Peering'
set protocols bgp 4242421678 neighbor 172.20.229.122 address-family ipv4-unicast route-map import 'Default-Peering'
set protocols bgp 4242421678 neighbor 172.20.229.122 address-family ipv6-unicast route-map export 'Default-Peering'
set protocols bgp 4242421678 neighbor 172.20.229.122 address-family ipv6-unicast route-map import 'Default-Peering'
Next, let's verify our routing table
vyos@vyos:~$ show ip bgp
BGP table version is 3720, local router ID is 172.21.99.225, vrf id 0
Default local pref 100, local AS 4242421678
Status codes:  s suppressed, d damped, h history, * valid, > best, = multipath,
               i internal, r RIB-failure, S Stale, R Removed
Nexthop codes: @NNN nexthop's vrf id, < announce-nh-self
Origin codes:  i - IGP, e - EGP, ? - incomplete

   Network          Next Hop            Metric LocPrf Weight Path
*> 10.11.160.0/20   172.20.229.122                         0 4242421080 4242423618 4242422855 64875 i
*> 10.37.0.0/16     172.20.229.122                         0 4242421080 4242421876 65043 65037 i
*> 10.50.0.0/16     172.20.229.122                         0 4242421080 4242421876 65043 65024 i
*> 10.56.0.0/16     172.20.229.122                         0 4242421080 4242421876 65043 65037 i
*> 10.60.128.0/20   172.20.229.122                         0 4242421080 4242421876 65043 i
As DN42 is a large network, we should see lots of routes.
Next, let's verify we can access a host over DN42. Let's try the DN42 Anycast DNS service
vyos@vyos:~$ ping 172.20.0.53
PING 172.20.0.53 (172.20.0.53) 56(84) bytes of data.
64 bytes from 172.20.0.53: icmp_seq=1 ttl=62 time=1.30 ms
64 bytes from 172.20.0.53: icmp_seq=2 ttl=62 time=1.76 ms
64 bytes from 172.20.0.53: icmp_seq=3 ttl=62 time=1.39 ms
^C
--- 172.20.0.53 ping statistics ---
3 packets transmitted, 3 received, 0% packet loss, time 2003ms
rtt min/avg/max/mdev = 1.300/1.486/1.761/0.200 ms
vyos@vyos:~$ dig +short SOA DN42 @172.20.0.53
j.master.delegation-servers.dn42. jrb0001.as4242420119.dn42. 1636112927 900 900 86400 900
vyos@vyos:~$
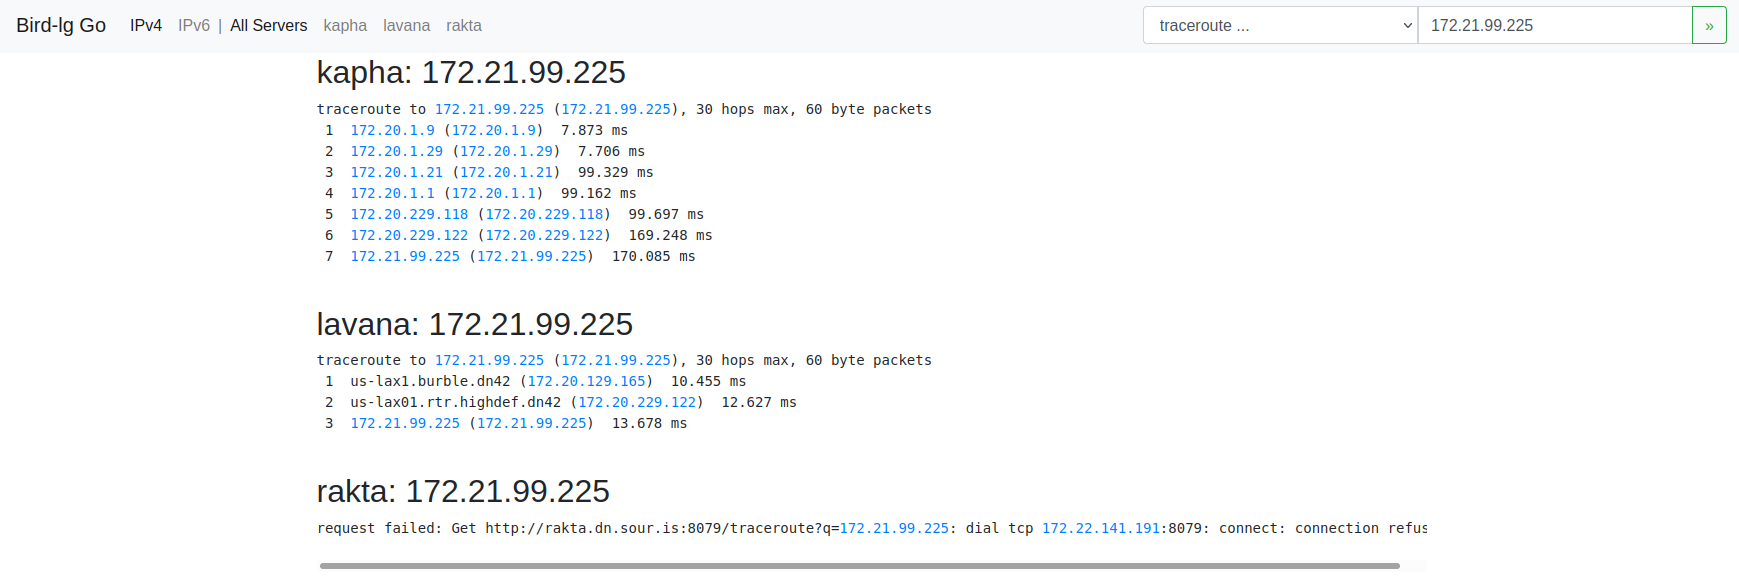
We can also use a network looking glass to see if other routers on DN42 can see us.
Part 5: Configuring our client
At this point, we are basically done! We have confirmed we are connected to DN42. Let's set up that second machine we created to connect into DN42 using our VyOS router.
We begin by configuring the second interface on our VyOS router. This second interface is our cloud provider's private network
set interfaces ethernet eth1 address '172.21.99.254/27'
set interfaces ethernet eth1 mtu '1450'
Now, we log onto that second machine and begin configuring its networking. Since it's Debian, we will use the classic /etc/network/interfaces file
# /etc/network/interfaces.d/1-static
auto lo
iface lo inet loopback
    dns-nameservers 108.61.10.10

auto enp1s0
iface enp1s0 inet dhcp

# control-alias enp1s0
iface enp1s0 inet6 auto

auto enp6s0
iface enp6s0 inet static
    address 172.21.99.226
    netmask 255.255.255.224
    mtu 1450
    up ip route add to 172.20.0.0/14 via 172.21.99.254 dev enp6s0
    up ip route add to 10.0.0.0/8    via 172.21.99.254 dev enp6s0
We delete any existing files in /etc/network/interfaces.d and then ensure our configuration is not overriden by cloud-config. We do this by adding the following to /etc/cloud/cloud.cfg.d/99-disable-network-config.cfg
network: {config: disabled}
Next, let's set up some basic firewall rules on this machine.
*filter
:INPUT ACCEPT [20:1048]
:FORWARD ACCEPT [0:0]
:OUTPUT ACCEPT [245:24463]
:LAN_LOCAL - [0:0]
:WAN_LOCAL - [0:0]
-A INPUT -i enp1s0 -j WAN_LOCAL
-A INPUT -i enp6s0 -j LAN_LOCAL
-A LAN_LOCAL ! -s <YOUR-DN42-PREFIX> -p tcp -m tcp --dport 22 -j REJECT --reject-with icmp-port-unreachable
-A WAN_LOCAL -m conntrack --ctstate RELATED,ESTABLISHED -j ACCEPT
-A WAN_LOCAL -s <YOUR-HOME-IP> -p tcp -m tcp --dport 22 -j ACCEPT
-A WAN_LOCAL -j DROP
COMMIT
# Completed on Sat Nov  6 00:39:03 2021
Replace your-home-ip and your-dn42-prefix accordingly and the run iptables-restore on this file. You can then install iptables-persistent to keep these rules persistent.
Next, let's set up a DNS server to access DN42s namespace. I installed dnsmasq and replaced /etc/dnsmasq.conf with the following. Please replace the listen IP address accordingly
# Listen address and port
listen-address=172.21.99.226
listen-address=127.0.0.1
port=53

# Do not check resolv
no-poll
no-resolv

# Use quad9
server=9.9.9.9
server=149.112.112.112

# Forward DN42
rebind-domain-ok=dn42
server=/dn42/172.20.0.53

# Reverse Forwards for DN42
server=/10.in-addr.arpa/172.20.0.53
server=/20.172.in-addr.arpa/172.20.0.53
server=/21.172.in-addr.arpa/172.20.0.53
server=/23.172.in-addr.arpa/172.20.0.53
We can then update our resolv.conf on both machines to use this newly created DNS server
vyos@vyos:~$ dig shell.fr-rbx1.burble.dn42

; <<>> DiG 9.9.5-9+deb8u16-Debian <<>> shell.fr-rbx1.burble.dn42
;; global options: +cmd
;; Got answer:
;; ->>HEADER<<- opcode: QUERY, status: NOERROR, id: 50814
;; flags: qr rd ra; QUERY: 1, ANSWER: 1, AUTHORITY: 0, ADDITIONAL: 1

;; OPT PSEUDOSECTION:
; EDNS: version: 0, flags:; udp: 1232
;; QUESTION SECTION:
;shell.fr-rbx1.burble.dn42.	IN	A

;; ANSWER SECTION:
shell.fr-rbx1.burble.dn42. 3600	IN	A	172.20.129.31

;; Query time: 16 msec
;; SERVER: 172.21.99.226#53(172.21.99.226)
;; WHEN: Sat Nov 06 00:50:52 UTC 2021
;; MSG SIZE  rcvd: 70
Part 6: Accessing a service on DN42
There are a number of public internal services available on DN42 such as the shell service pictured above.
The shell service provides full access to a Linux server over SSH. Authentication is provided using your mntner name and the SSH key added to the auth field of that object.
Let's try it
[rohan@nuc1 ~]$ ssh etherarp@shell.fr-rbx1.burble.dn42 -J vyos
Welcome to VyOS
The authenticity of host 'shell.fr-rbx1.burble.dn42 (<no hostip for proxy command>)' can't be established.
ED25519 key fingerprint is SHA256:maO8tVa2Qpat/xVDhB++eWZvgnZ/IzW79xbPmrFqr5o.
This key is not known by any other names
Are you sure you want to continue connecting (yes/no/[fingerprint])? yes
Warning: Permanently added 'shell.fr-rbx1.burble.dn42' (ED25519) to the list of known hosts.
Welcome to Ubuntu 20.04.3 LTS (GNU/Linux 5.4.0-81-generic x86_64)

  System information as of Sat  6 Nov 00:53:16 UTC 2021

  System load:             0.03
  Usage of /home:          0.8% of 39.12GB
  Memory usage:            29%
  Swap usage:              0%
  Processes:               157
  Users logged in:         0
  IPv4 address for enp5s0: 172.20.129.31
  IPv6 address for enp5s0: fd42:4242:2601:1016:216:3eff:feae:51a8
  IPv4 address for enp6s0: 178.33.134.8
  IPv6 address for enp6s0: 2001:41d0:8:127:216:3eff:feae:51a8
----------------------------------------------------------------------------

This is shell.fr-rbx1.burble.dn42
See https://burble.dn42/services/shell/ for more details.

The service here is provided for your benefit.
Abuse just spoils the fun for everyone else and will not be tolerated.

If you have problems, or would like additional packages installed
you can raise an issue here: https://git.dn42.dev/burble/config-shell

----------------------------------------------------------------------------

Last login: Fri Nov  5 23:38:32 2021 from 172.21.99.225
etherarp@shell-fr-rbx1:~$
Notice how I'm actually connecting from my home machine. This is through the SSH ProxyJump option which I've described in another post
Let's measure the speed of the connections over the DN42 network. From our debian client, let's install and run iperf3
root@client1:~# apt-get install iperf3
Reading package lists... Done
Building dependency tree... Done
Reading state information... Done
The following NEW packages will be installed:
  iperf3
0 upgraded, 1 newly installed, 0 to remove and 0 not upgraded.
Need to get 0 B/28.4 kB of archives.
After this operation, 60.4 kB of additional disk space will be used.
Selecting previously unselected package iperf3.
(Reading database ... 38819 files and directories currently installed.)
Preparing to unpack .../iperf3_3.9-1_amd64.deb ...
Unpacking iperf3 (3.9-1) ...
Setting up iperf3 (3.9-1) ...
Processing triggers for man-db (2.9.4-2) ...
root@client1:~#
root@client1:~# iperf3 -s
-----------------------------------------------------------
Server listening on 5201
-----------------------------------------------------------
Now, let's measure the connection speed to our Debian machine from the shell server
etherarp@shell-fr-rbx1:~$ iperf3 -c 172.21.99.226
Connecting to host 172.21.99.226, port 5201
[  5] local 172.20.129.31 port 43036 connected to 172.21.99.226 port 5201
[ ID] Interval           Transfer     Bitrate         Retr  Cwnd
[  5]   0.00-1.00   sec  2.76 MBytes  23.2 Mbits/sec    0    428 KBytes
[  5]   1.00-2.00   sec  8.73 MBytes  73.2 Mbits/sec   10   1.78 MBytes
[  5]   2.00-3.00   sec  12.5 MBytes   105 Mbits/sec    0   1.95 MBytes
[  5]   3.00-4.00   sec  13.8 MBytes   115 Mbits/sec    0   2.09 MBytes
[  5]   4.00-5.00   sec  13.8 MBytes   115 Mbits/sec    0   2.20 MBytes
[  5]   5.00-6.00   sec  11.2 MBytes  94.4 Mbits/sec   12   1.61 MBytes
[  5]   6.00-7.00   sec  8.75 MBytes  73.4 Mbits/sec   27   1.20 MBytes
[  5]   7.00-8.00   sec  8.75 MBytes  73.4 Mbits/sec    0   1.27 MBytes
[  5]   8.00-9.00   sec  7.50 MBytes  62.9 Mbits/sec    0   1.31 MBytes
[  5]   9.00-10.00  sec  8.75 MBytes  73.4 Mbits/sec    0   1.34 MBytes
- - - - - - - - - - - - - - - - - - - - - - - - -
[ ID] Interval           Transfer     Bitrate         Retr
[  5]   0.00-10.00  sec  96.5 MBytes  80.9 Mbits/sec   49             sender
[  5]   0.00-10.15  sec  95.2 MBytes  78.7 Mbits/sec                  receiver

iperf Done.
etherarp@shell-fr-rbx1:~$
Not bad!
Conclusion and next steps
This was a fun weekend project and was a good introduction to BGP peering. As a next step, reverse DNS could be set for my prefix so that its IP addresses resolve to names.
Thanks for reading.